KinderGals

Search This Blog

Friday, November 8, 2013

Celebrating Reader's Workshop

Friday was celebration day! Megan has just finished up Unit 1 in Reader’s Workshop…yes, she’s a little behind. When Matthew and I arrived, the kiddos were all busy at the tables drawing pictures of things they like to read about.
Slide2
Then, they all moved to the floor and made a circle! Let the crazy begin! I am sure if you have ever tried to do a craft with 27 kids all at the same time, you have a mental image of what was going on! That said, it was a blast!
Slide3
Megan used the pattern to cut the heads, but gave them squares of white, black and pink paper. The kids rounded off the corners to make circles! They did great! (Hmmmm they didn’t all look like circles, but…..)
Slide4
After adding the hair, we gave them each a piece of paper. Megan demonstrated how to fold it, and most of them were successful!Slide5
They added their name badge,their arms and hands. Then, they glued their writing inside of the shirt.
Slide6
After they left, Megan had me staple the hearts and hang them on the bulletin board. They turned out soooo cute!
So now….on to Unit 2, Powerful Partnerships! We are playing a little catch up. So we are looking at the lessons to see which things can be taught at another time of the day, which things were covered already, and which things we can NOT skip! Hopefully we can get back on track! That said, Megan and I both feel that it is better to give them a firm foundation in these first two units and not skip lessons! It pays off BIG time in the end!
Pin It!

Tuesday, November 5, 2013

A little of this and a little of that…Centers, Math, and Journals

Slide1

This is going to be a rambling post….a little of this and a little of that. None of the ideas are enough for a whole post, so I just decided to lump them together.  So here goes…First ….centers…

This shelf holds the “have to” activities for literacy and math centers. Each week we have 5 have tos for literacy and 5 have tos for math. The kids are in groups and the groups rotate to the different areas of the room, one area each day of the week. While in the area, they complete the “have to” and then there are some “can dos”….activities that they can choose from until center time is over. Each group has a team leader. When it is center time, the group leader goes and gets the tub for their group from the shelf. When center time is over…they simply put the supplies back in the tub and return it to the shelf. I have done several posts on math and literacy centers so you can always search the blog for more information on how we organize our centers. Slide2
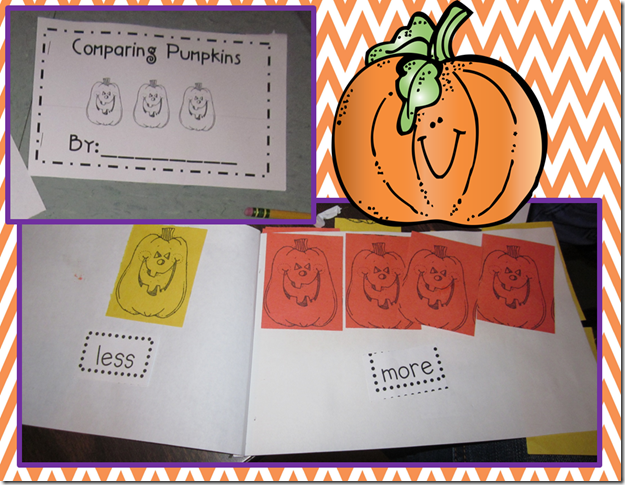
This is such an easy way to teach more and less. The kids roll a dice and glue down that many yellow. They roll again and glue down that many orange. Then, they decide which side gets more and which side gets less.  I was  thinking…maybe we need to add a place for the children to write the numerals and a place to use the >, <, or = symbols.

Slide3

This center is a great way to build mental images of number combinations. The kids roll a dice and count that many yellow. Then, they roll the dice again and count that many orange. Then they complete the text box.  I was thinking…maybe give them a dice that has higher numerals. They roll the dice, then they could come up with a number combination for that numeral.

Slide4

These number books are super easy for them to do by themselves. They are from Kathleen’s Pederson’s Number Unit.
Slide5

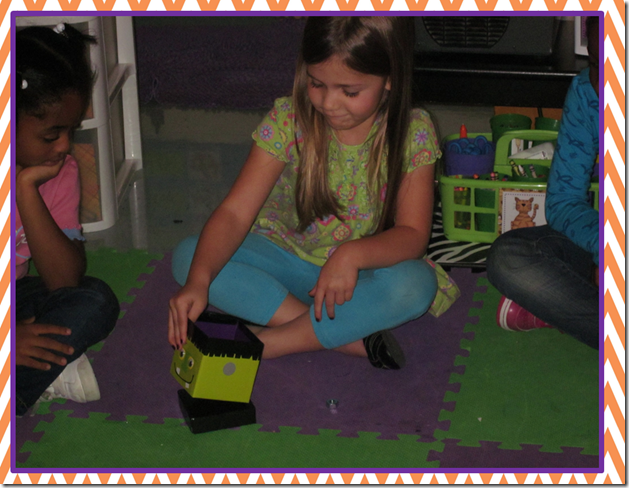
Last week, I blogged about getting these cute boxes from The Dollar Tree and a fun game that you can play as a center for number combinations.

Here is another game you can play that works on cardinality. Put a determined number of bolts in the container. Turn on the music and pass the container around the room. When the music stops, whoever is holding the box spills out the bolts. Then, as they put the bolts back in the box, they count them. Now, that addresses the counting standard. But, how is that different than cardinality? Cardinality is..the last number said tells how many are in the set. So after they count them all back into the box, ask, “So how many bolts are there?” If the child says the number, they have cardinality. If they count them again, they don’t!

Slide6

Here are a couple of other pumpkin activities that Megan did last week. After estimating the circumference of the pumpkin with orange string, they used the string to make a pumpkin. There is a recording sheet that goes with this, but I didn’t get a picture! Sad smile

Slide7

Here was the recording sheet that Megan used for the float or sink experiment. She used several sizes of pumpkins, starting with the smallest. Each time she asked, “will it float or will it sink?” Of course they thought the bigger pumpkin would sink!
Slide8

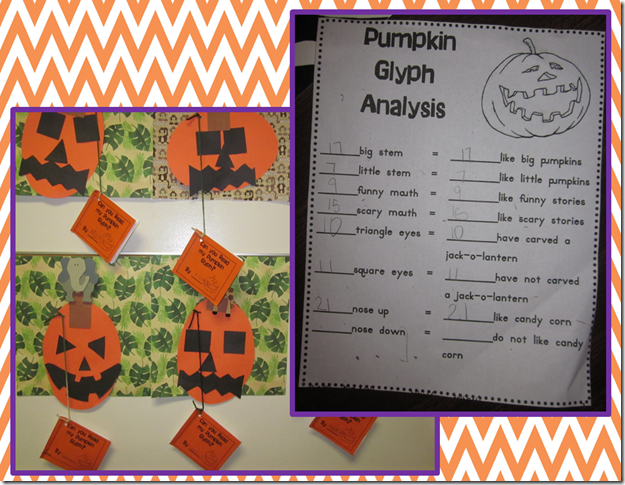
Here’s where they made their pumpkin glyph. The little book that is hanging from the pumpkin is where they did the interpretation of their jack o lanterns. Then, when they got back together as a group, they completed the class analysis sheet.

Slide9

During literacy centers, one of the have to’s was a cut a sentence pumpkin book. Here I was showing a little girl how to find the word green in the ring of color words so that she would know what color pumpkin to glue down. As they finished and were reading them to me, I would ask them “How did you know that it said ‘green’?” Most of them could tell me that they looked at the picture. I would follow up with “Yes, that’s right. Good readers know to look at the picture first.”

Slide10

One of their favorite can do centers is the overhead. I am sure that your school has plenty of these hidden in closets. If not, check with the district warehouse. I know they are hiding somewhere….

Slide11

The absolutely love the pack by Deedee Wills. I put piece of white paper behind each type of transparency to take the picture. They love being the teacher!

Slide12

We finished up the day working in their journals. I love these simple journal covers. Just staple plain paper behind the cover and they are ready to go. I especially love the word bank on the front. I made these for each unit. They are in the Theme Journal Cover Pack. This is the place where the kids can write whatever they want. They can explore with the different genre’s that they have learned! We allow them to write about whatever interests them. It sure makes it easier to keep them busy when they pick the topics!

Pin It!

Sunday, November 3, 2013

Anchor Charts: How Do You Display Them?

Do you think about where you hang your anchor charts? What if I told you the brain can remember the charts best if we display them in a certain way? Read on to see how and why! 
Slide1
Finally made it to Megan’s room on Friday!After lunch I packed Matthew up and said, “Let’s try this.” I miss being in her room so much, but I love keeping Matthew. So how happy were we when he fell asleep as soon as I got there. (I had just fed him!) And yes, he stayed asleep until the kids left! I couldn’t believe that he would sleep through the noise of 27 kindergarteners, but he did!
So as I was working with kids, I tried to snap a lot of pictures to share with you. I thought I would start with sharing how we display the anchor charts.
Slide2
Since Megan’s room has a magnetic dry erase board, she set up her anchor chart display there. Here’s what we know…the brain can easily retrieve information if we help get that information organized. One way to do this is to always hang the anchor charts in the same location in the room. That way, once the chart is taken down, the brain has a picture of that chart and can retrieve the information simply by “seeing” that wall in their mind.
The Literacy section is empty, but this is where we hang the reader’s and writer’s anchor charts. The charts are from the 9 Reader’s Workshop units and the 3 Writing units that we use for our workshop times.
One of the staple charts for math is the All About the Number…Anchor Chart. Each week, for 20 weeks, we explore a different number, learning everything we can about that number. The other chart that you see is our Shapes Anchor Chart from the Shapes Unit. Each time we start a unit, we think what are the standards? Then, we bullet them into the lessons that we are going to teach and that becomes the anchor chart. It reminds both us and the children what is important.
Slide3
Another chart that we use every week is our ABC Unit Vocabulary Chart. We continue adding words to the chart only removing them when we start a new unit. So where is it hanging? Yep, from the window blinds. We keep the blinds closed because the sun beats down in the window making the room really hot not to mention how quickly the sun can fade the paper and fabric in the room!
Slide4
I displayed a photo of Megan’s academic vocabulary chart last week, but here is one that she actually completed with her kids. They worked together to come up with the words, or linguistic representation, to describe the vocabulary word. Then, each child was given a post it note and asked to draw a picture, nonlinguistic representation, to show what the word means. The picture in the lower right corner shows her academic vocabulary word wall. While not all words will be defined using the vocabulary chart, here is where all words can be displayed. As you can see she only has one word up. This is something that her sub was not asked to do while Megan was on leave. She wanted to start this herself. She will be adding more words over the remaining weeks. These words come from the Math Academic Vocabulary Unit and the Literacy Academic Vocabulary Unit.
So…how do you hang your anchor charts? Feel free to leave your ideas or a link to a post on your blog in the comment section!
Pin It!

Sunday, October 27, 2013

Classroom Management: Establishing Routines and Procedures

So is the honeymoon over for you and your kids? This is the time of the year when their behavior can really start getting under my skin.
Last week was Megan’s first week with her class after a 12 week maternity leave. Her sub did a great job, but we all have our pet peeves, and she has some retraining to do…especially with the holiday season approaching.
Slide1
She got right to work with establishing her expectations. She used some of the things in my new Tackling Transitions Pack. This pack was developed when I updated my “All Eyes on You” classroom management workshop and decided to bundle all the ideas into a pack for tpt. 

The first part of this pack is designed to help with those day to day transition times that can often be difficult and exhausting! We all get tired of asking kids to behave, so…..instead here are some fun games that will help you get the job done! While one set has catch phrases and another has a “happy rock” sign, the other 4 sections include multiple versions of the same game. That way you can change the clip art throughout the year to keep it fresh and exciting.
Slide13Slide5So the question is, “What do you do when they accomplish the goal?” “How do I celebrate?” Well, it is my belief that simple is best! The children are just as excited to blow bubbles or write with sidewalk chalk. Talk to your kids. Ask what they would like to be working for. I add “happy rocks” to the happy rock jar for accomplishments, then when the jar is full…we celebrate!
Slide47The second part of this pack is designed to give you some activities that you can use as transitions from one activity to another. There are interactive charts, flip books, cookie sheet activities, and folder songs. There are seasonal selections so that you will have a variety to use throughout the year. The words to each song or poem are also included in a reproducible format so that you can use it in your poetry journal. The common core standards are included as well.
Slide53Slide59
There are 7 interactive charts, 5 flip books, 1 cookie sheet activity, and 3 folder songs. Priced individually this pack would be $45! It is priced at $20, but is on sale for $15 until Halloween.
Pin It!

Wednesday, October 23, 2013

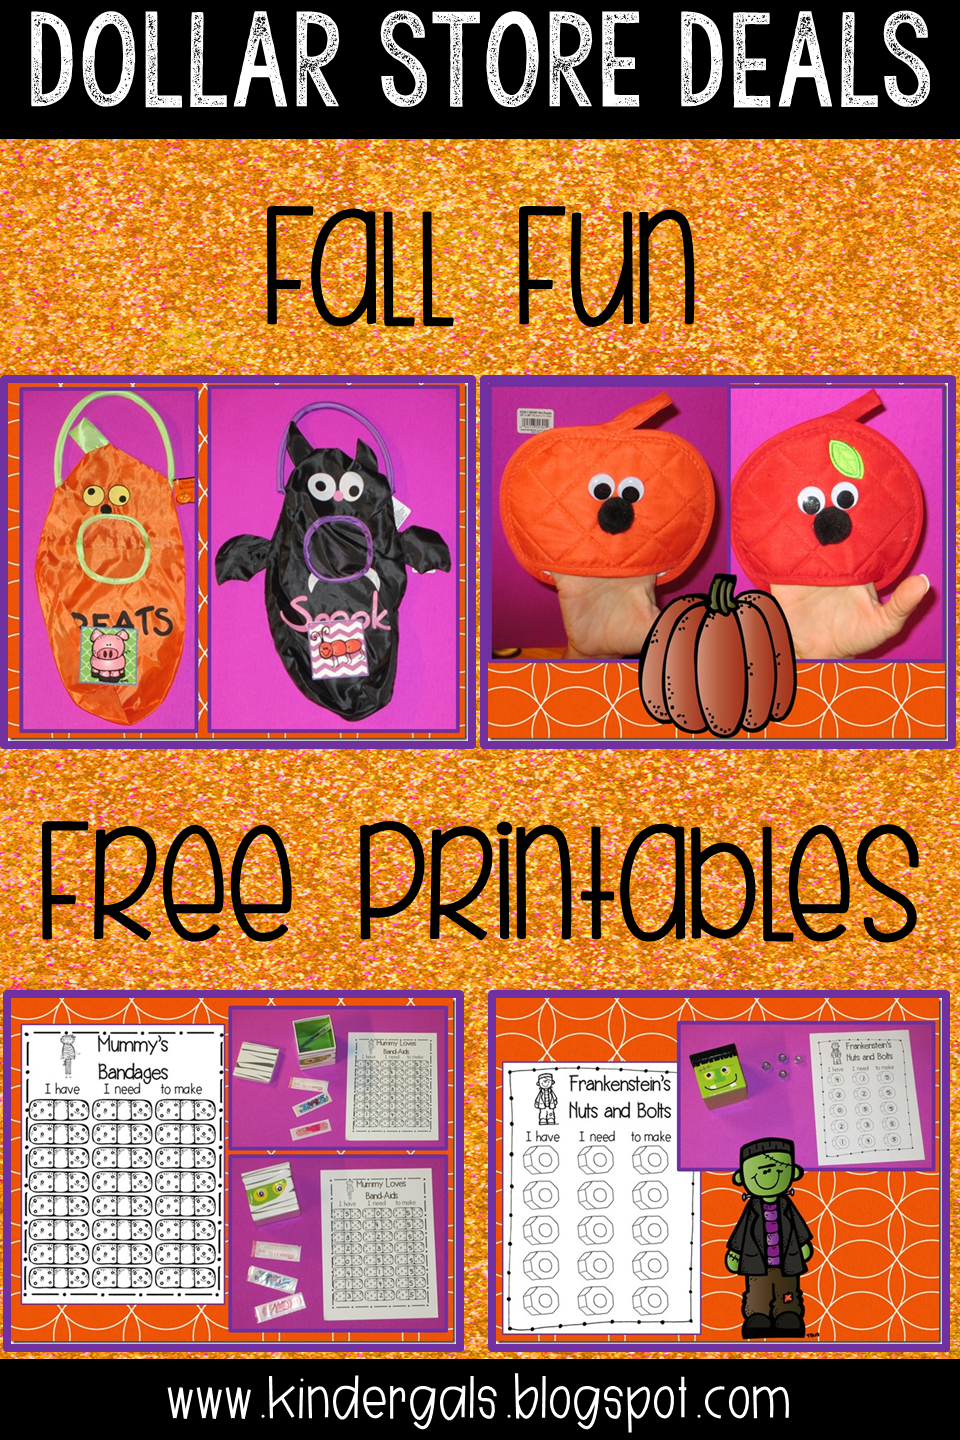
Fall Fun Dollar Store Deals to Engage Your Kiddos

This post has some fun ideas for using dollar store finds to engage your kiddos! There are also 2 free printables ready to go!
Slide1

The dollar spots are full of fun things for Fall! Here are a few find from this week.
Love the note pads for write the room.
The tins are great to store games.
Slide2
The glasses are fun for read the room. I always have a “light” on my teaching table. If I have it turned on, then the kids know not to interrupt me. Love the pumpkin light. I love the felt stickers for sticker stories. I give the kids a sticker to use in their illustrations. Then, they write a story to match their illustration.
Slide3
Love these trick or treat bags. I used a piece of velcro to attach a picture on the front. They are going to sort small toys or picture cards into the bags. In this case, it is 2 different games. Day 1, have children find all the pictures or toys that start like pig and put them in the bag. Day 2, have the children find all the pictures that end like ant and put them in the bat bag. Slide4
Loved these pot holders in the target dollar spot. I added wiggly eyes and a pom pom nose. Now I can use the pumpkins (I made 5) to act out the Five Little Pumpkins song. The apple is for the Way Up High in an Apple Tree poem.
Slide5
Found these clear plastic pumpkins in Target, too. The game boards are from my Math Attack pack. Instead of using the pumpkin clip art I am going to use these.
Slide6
Target also has the clear plastic leaves and acorns.Slide7
This mummy box is so flippin cute!  I walked around with it in my hand for a while so I could think of what I could do with it. So here’s what I came up with:
1. Put a given numeral of bandaides in the box. Put the kids in a circle and pass the box around while you play music. When the music stops, whomever is holding the box, spills the bandaides and counts them. This is great for practicing cardinality. After they count them, ask “So how many bandaides are in the box?”  If they look at you and say the number, then they have cardinality. If they count again, they don’t. Cardinality means that the last number said tells how many are in the group.
2. Here’s another game. Decide if you want to play how many to make a 5 or how many to make a ten. Count out that many bandaides. Put some of them in the box and put the lid on. Now put the rest on the table. The children have to figure out how many are in the box by looking at how many are on the table. Is it too hard for them? Then use a 5’s frame or a 10’s frame to help them build that mental image.
Slide8
They also had this Frankenstein box! So you can play the same games using the bolts.
Grab the recording pages for the Mummy’s Bandages and Frankenstein’s Nuts and Bolts at the bottom of this blog post.

Pin It!

Tuesday, October 22, 2013

Developing Vocabulary

Vocabulary is essential to success! This post shares how we teach our kids academic vocabulary as well as content vocabulary.
Slide2
Well the day finally arrived. The day after Matthew turned 5 months old Megan headed back to kindergarten. We are all so glad that she took an extended time off to be with him. Not only was it good for Matthew, it was good for Megan to see that she “wanted” to work. She loves teaching and would miss it terribly if she was home all day. Her first day back was great. She was super excited about what her kids could do. Ms. Kristi did a great job getting them this far!Megan received lots of love letters during writer’s workshop. Man….can they write! So where does this leave me now that my shopping partner is back at work? At home with Matthew! He is such a joy, but lots of work. I know now why young people have babies! I am so excited that I was able to cut back on work this year to stay home with him 3 days a week and only travel Sunday to work Monday and Tuesday!
Slide3
Last week Megan started preparing herself for going back to work. She ironed her clothes, loved on Matthew and got some “teaching” things together. She decided that she needed to have some things that she did every week, repeating the same basic idea. She doesn’t want to have to stay really late prepping materials. Here are a few of the things she put together to help with vocabulary.

Academic Vocabulary

Each week we pick one math word and one literacy word that we want to take to a deeper level of understanding. These are the words that are REALLY important for the kids to understand. My kindergarten team worked together to determine which words they need a firm understanding of to be successful in first grade. Then, each week we spotlight those words. First, we have the kids draw a picture of what the word means. This is called a nonlinguistic representation of the word.  Next, we all meet together on the carpet. We talk about the word and come up with "our definition". We should NOT give the kids a definition. Instead we want them to create their own. This is evidence of a deep understanding of the word.
Here is Megan's idea...Instead of creating the chart each week on chart paper, just make it on a piece of poster board. She laminated the board so that she can use the same board every week. Children’s non linguistic representation of the word is drawn on post it notes and stuck to the chart. She attaches paper to the other section to have the children generate a definition. You can get the letters here to make the title "Vocabulary" for your chart.
 
Both the Literacy and Math Academic Vocabulary are in this bundled unit.
https://www.teacherspayteachers.com/Product/Academic-Vocabulary-Interactive-Journal-Bundle-by-Kim-Adsit-1082432

Content Vocabulary

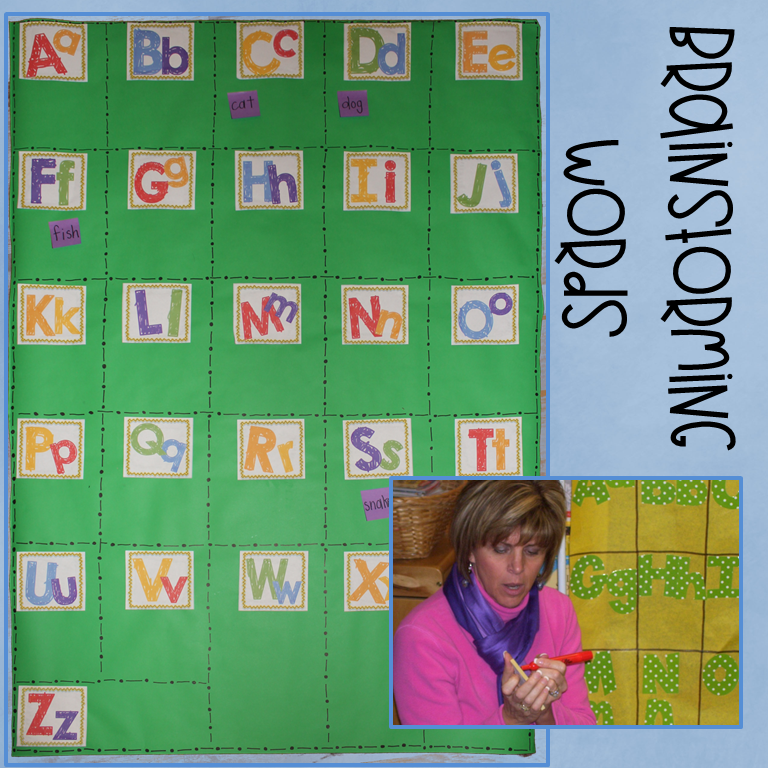
Content Vocabulary are Tier 3 vocabulary words. That means they are words that you need if you are engaged in the topic.  It is very important to develop content vocabulary in order for children to comprehend nonfiction text. We use an ABC Chart for organizing our Content Vocabulary.
Each week, during our word work time, we brainstorm content vocabulary words. If it is a new unit, the children are sharing words from their existing knowledge of the topic. The second and third weeks of the unit, the children are sharing words that they are learning.  As the children share words, I write them on post it notes and attached them to the abc chart by their beginning letter.
As I am writing them on the post it notes, the kids are adding the words to their Unit Vocabulary Notebooks. These are a great tool for writing!
 Megan made her chart on two sheets of poster board that she taped together after she laminated them. (She was really quick to tell me that hers was cuter!  Smile)
https://www.teacherspayteachers.com/Product/Morning-Meeting-Pack-It-Learn-It-by-Kim-Adsit-750309
This idea is part of our Pack It! Learn It! unit.
Pin It!

Wednesday, October 16, 2013

Thrifty Thursday—How to Shop the Dollar Store

Who doesn’t love a trip to the Dollar Store? Don’t you get a rush when you see all that stuff you can get for only a dollar? Do you automatically check out the Dollar Spot when you go to Target? Well then, you make have an addiction….So from one addict to another, here are my best tips for shopping the dollar store:
1.  Shop with a friend. It is amazing how much more creative I am when I am shopping with someone else. 
2. Go down every isle. Don’t just look on the isle with the teacher items or the toys. Look at every item and ask yourself, “What can I make with that?” or “How can I use that to make my classroom more organized and efficient?”
3. Go to every dollar store and go often. There are lots of discount stores that I like—Big Lots, Fred’s, Dollar General, Dollar Tree, Target. 
Here are some things I picked up at the Dollar Tree this week:
Slide1
Love the glasses for read the room! Julie Lee has a cute game where she used sunglasses for an addition center. It is in her Weather Unit .  http://www.teacherspayteachers.com/Product/Whats-the-Weather-Math-Literacy-Centers-512075
The skeleton is great for hangman. Not sure how I am going to use the jack o lantern and skull. I’m thinking part/part/whole or cvc words. 
Slide2
This mouse makes a great math game. Buy enough mice for a small group. Remove the string tail and add a pipe cleaner as the tail. Now, to play the game, invite the children to roll a dice. Whatever numeral is on the dice, have them put that many pony beads on the pipe cleaner. Roll again. Look at the numeral on the dice. How can you make it so that your pipe cleaner has that many beads. For example, first they roll a 5 so they put on 5 beads. The second time they roll a 3. So they need to take 2 beads off. Keep rolling and have the children either add more beads or subtract some so that the number of beads matches the numeral on the dice.
So who else has a dollar store obsession? I’m going to try my first linky! Each week let’s share our thrifty idea of the week. It could be something that you picked up at the Dollar Store. Or, it could be something that you are recycling and using “trash” in a unique way. I have done a lot of dollar store posts in the past. Here are links to some of them:
http://kindergals.blogspot.com/2013/08/dollar-store-deals.html
http://kindergals.blogspot.com/2013/04/wanna-go-to-dollar-store.html
http://kindergals.blogspot.com/2013/03/teachers-gone-wild-dollar-store-style.html
http://kindergals.blogspot.com/2012/07/4th-of-july-dollar-store-trip-and-look.html
http://kindergals.blogspot.com/2012/07/thrifty-thursdaywords-and-phonemes.html
http://kindergals.blogspot.com/2013/04/whats-at-target-dollar-spot.html
http://kindergals.blogspot.com/2012/06/thrifty-thursdays-feather-duster-ducks.html
http://kindergals.blogspot.com/2012/06/thrifty-thursday-counting-games-number.html
http://kindergals.blogspot.com/2012/06/more-puppets-for-thrifty-thursday-five.html
So link up below with a “Thrifty Thursday” tip! Can’t wait to see them!

Pin It!
 
Pin It button on image hover

Receive All Free Updates Via Facebook.