KinderGals: October 2016

Search This Blog

Sunday, October 30, 2016

Teaching Fire Safety to Young Children

Have you heard of themes, units, studies, integrated curriculum? Are you afraid to use those words thinking that they are "bad" words? Why is it that in education certain practices are often applied in ways that are not effective, yet little time is taken to see why? Teaching a theme is more than matching fire dogs and fire fighters with capital and lower case letters. Themes, units, studies or integrated curriculum are all ways of saying the same thing.  Teaching with this approach allows for the teacher to make connections between content areas and to show the children how we use reading, writing, and math to learn about concepts in science and social studies that interest us. It is a way we can bridge our day together as we use a certain topic in our shared reading, read a louds, writing projects, graphic organizers, and on and for a more global approach to teaching.  I love hearing young teachers talk about "setting the stage to engage". This concept is theme teaching on steroids!
 A few weeks ago I was working in Illinois. Since I'm not very good at geography, it wasn't until Adam, from Teachers Learn Too, texted me that I realized I was going to be pretty close to his school!  Adam and I started our friendship many years ago when he was a first year teacher.  Most of you know that I have a daughter and a daughter in law who are both teachers. But, Adam is like my teaching son! I am so proud of him, his character, his dedication to his profession, and his ongoing thirst to improve his craft. This post is all about the day that I spent in his room.
How pumped was I when Adam asked me if I wanted to teach a lesson! I visit lots of classrooms, but I  never want to take over or make the teacher feel uncomfortable because I'm there. Adam wanted me to introduce the Dalmatian/fire hydrant phoneme segmentation game. First, after a little challenge of my own trying to figure out how to use the document camera, I modeled how to play the game. (Thanks Adam for being patient with this old dog!) This was MY TURN.
 Then, we transition to OUR TURN. You could tell that Adam's kids were very comfortable with this type of teaching. They quickly moved into their little groups to get ready to try it out. (Good job, Adam!) As I named each of the pictures, the kids would segment the word together as one child in each group slid the hydrants onto the game board. We repeated the process with several cards giving all of the children a chance to try it out. During this time, Adam and I observed. Who was getting it? Who was having a hard time sliding the hydrants? We can use this data to help form small groups where Adam can support the children who need it while challenging those who are ready.
Now it's YOUR TURN. Adam can move this activity into one of his centers. The children are familiar with the game. Even those who had difficulty with the skill, know the HOW to play. The concept will come with repeated practice.
Here are a few of the other activities we did in Adam's room. To play this game, we would spin the spinner. The children would put that many buckets on their fives frame ladder. Then, they would have to determine how many more they would need to make a 5.
Adam had a parent volunteer who worked with the children to create this Dalmatian. 
Before gluing the letters onto their Dalmatians, they used the letters to do one of two activities. Some children could sort the letters in various ways and record their sort on the recording page. Other children could use the letters to think of little words they could make with those letters.
For two days before I came, Adam was already building schema for fire safety. Each day they tackled one section of the tree map. As Adam completed the large tree map, the children each worked to complete their own tree maps.
Labeling a Fire Fighter is a great connection to non-fiction features. Try to find a fire safety book that uses labels as your mentor text prior to this lesson.  As you are matching the labels to the various parts, think about using the reading strategy "good readers look at the first letter." Each word starts with a different letter except boots and badge. For these two words show the children how to look all the way through the word.
 Whether your school has nap time or not, I love this idea for a little down time. Each day, Adam has "rest and write". During this time the children are applying their "theme" to a concept in language arts. Today they were applying their knowledge about fire fighters in order to make connections. The kids were also learning that good readers make connections to the characters in the story. This helps us understand why characters do and say the things they do and say.
 At first Adam's kids were a little hesitant. They wanted help "spelling the words." When we realized they were all feeling less than equipped to do the assigned task, we assured them. We simply told them to do their best. They could use pictures, letters, and words to help us understand how they made connections to fire fighters. 
Another activity that I LOVE to do with fire safety is to make a fire truck brace map. (This activity was done in Ginny's prek room, not Adam's.) After reading the kids a book about fire trucks, I took a clip art image of a fire truck and cut it apart to make all of the pieces. We then worked together to label each part, just like we had done when we labeled the fire fighter.  Now, the fun part.  I gave each child a baggie with the pieces needed to make a fire truck snack.  We talked about each part of the fire truck and which part of the snack represented that part on the fire truck. The children then assembled their snack.  After eating the snack, I gave each child a brace map recording page. Here they drew the parts of the fire engine. Some labeled with beginning sounds, some used pictures, and some copied the words from the large brace map.
Some more math activities you could explore include number combinations fire badges, fire fighter glyph, roll and race fire trucks, and number combination Dalmatians.
Some more literacy activities include fire bucket rhyming sort, beginning sound fire hydrant flap book, and 5 Cute Dalmatians Song.
In Science and Social Studies we could compare doctors and firefighters after learning about each. The children make a fire fighter paper doll book where they record their learning about fire fighters.
Ideas for this blog post were taken from Fire Fighters.
https://www.teacherspayteachers.com/Product/Fire-Fighters-Literacy-and-Math-Activities-for-the-Common-Core-by-Kim-Adsit-332739
Pin It!

Wednesday, October 26, 2016

Easy Steps to Build Book Talk...with Partner Reading

Have you ever tried to get kids to read, discuss, and enjoy books with their friends only to be disappointed when they just sit beside each other? I remember telling my kids it is going to be a great day because we are going to get to read books with our friends. I would be so excited that we had reached that milestone. But, I soon realized that I had not set my kids up for success. I had not scaffold my kids. I had not provided the mini lessons to teach them HOW to read books with partners.  My friend, Michele, and I worked together to create a series of mini lessons that we could use to provide that HOW for our kids.
The mini lesson is essential in providing that scaffolding needed to ensure success. We use mini lessons to teach the children how to read with partners.
The Mini Lesson follows this guideline:
Connect: "Remember yesterday when we..." This is where we remind the children what we did yesterday.
Teach: "Today I am going to show you..." This is where we name the standard we are teaching. "Let me show you what I mean." This is where we model what it would look like. We take on the role of the reader.
Active Engagement: "Now let me see you try." This is where the kids actively practice the new skill you just taught. During this time you are observing, taking notes, and offering help.
Link: "Remember boys and girls, today and everyday, good readers..." This is where we remind the children what we just learned.
 
Up until this point we have our children reading books by themselves. Each day we are adding to our time as we build stamina. Once kids are successful reading independently, it is time to introduce partnerships. In a kindergarten class this usually happens after the first month, in first grade after a few weeks.
Here are some key points when developing partnerships.
  • Partnerships are based on reading/language levels.
  • Partnerships should be like ability.
  • This is a time for all kids to grow as readers, not a mentor/mentee partnership.
  • Partnerships should change every few weeks. When you notice a decrease in stamina or more off task behavior, consider changing partners.
  • One thing I remember when establishing partnerships is the saying, "the one doing to talking is the one doing to learning."  I want partnerships where there will be an equal exchange of conversation.
  • Stamina for partners is built slowly just like for private reading time. This means, that your children have worked longer independently than with their partners. This is because they have been reading independently for several weeks to a month before they start reading with partners. It is possible for the children to have an independent reading stamina of 8 minutes and their partner reading stamina be 4 minutes.
  • Each day, add time to both the independent reading time and the partner reading time.
After the mini lesson, it is time for Application, or work time. Here's how that might look:
  • We send kids off with their bag of good fit books to read independently.
  • They sit back to back, or close to their partner.
  • I set the time for our stamina growth target for independent reading time.
  • When the time goes off, the children turn and move closer to their partner. By placing them closely together for independent reading time, movement and off task time is minimized.
  • I set the time for our stamina growth target for partner reading time.
  • During this time, I am moving around the room to ensure that all children know the procedures and expectations. Don't worry about pulling small groups until your children are working well independently and know the expectations.
As we begin our mini lessons on developing Powerful Partnerships, Michele and I teach our kids how to read with their friends. The various ways to read with friends are taught over the course of the week. Each day, we learn a new way to read with friends and practice it during the mini lesson. As the children move to read independently and then with partners, you are observing and making notes as to which children are easily applying the new learning. Make notes of which children may need extra support.
One of the ways we teach children to read together, is for them each to read a book out of their own collection. Here, one child is reading while the other child is listening. Then, they swap roles. Teaching the role of the listener is a mini lesson that we cover in Unit 1, but it needs to be reminded and recognized as the children are working.

The next day, we teach our children how partners can read a book together. This strategy is best modeled using books with rhythm, poems, songs, poems or chants.  Rhythmic books like Brown Bear, Brown Bear, song books like Five Little Ducks, or predictable books the children made during centers, are all good choices for this way of reading together.
 Here partners are reading from an alphabet chart.
Here partners are reading from our class poetry journal. (This is from Kim Jordano's poetry unit.)
Day 3 we teach our children  how they can take turns with the same book--you read the book, and then I can read the same book. This works really well with books that were used in guided reading lessons (both partners have the same book in their bag). Or, they can also practice this strategy with books made during centers where again they would both have the same book.
This works really well with  Cut, Stack, Staple Read books,
https://www.teacherspayteachers.com/Product/Sight-Word-Readers-Cut-Stack-Staple-and-Read-299406
 and with the Cut a Sentence Books.
https://www.teacherspayteachers.com/Product/Sight-Word-Readers-Cut-A-Sentence-Bundle-by-Kim-Adsit-and-Megan-Merrell-1877613

Once we have introduce all three ways, we want to model what it looks like to keep busy the whole time. I'm sure you have seen it. You send them off to read together. They get started reading a book together, right away. In a few minutes you look over and they are just sitting there. When you inquire, they respond---we did it, we read a book together. During this lesson we model how to read a book together, then decide which of the three ways do we want to read our next book.  The children continue reading books, one of the three ways taught, until the time is up.
 
 Here's what is happening... 
  • Our kids are reading independently and building stamina.
  • They can easily transition to working with partners.
  • We have our kids reading books together.
  • They are staying busy the whole time.
  • All is well in kinderland!
But we aren't done yet. Now we introduce how to TALK about what we are reading.  Again, the scaffolding is built during mini lessons.  Each day we teach and practice how readers talk about what they are reading. By the end of the second week, the kids have the necessary skills to support book talk.
Michele introduced me to the Sticky Note Folder. It is a piece of 9x12 construction paper folded in half. On the inside, we place an icon associated with each of the 4 things we can talk about with our partners. Beside each icon, we place a few sticky notes.
During independent reading time, the children are using the post it notes to mark the things they want to share with their partner---they are getting ready to share.
Then, when is time for partner reading, the children take turns sharing. They can quickly turn to the page(s) with sticky notes. They share their connection, something new they learned, something that is really cool, or their favorite part. 
We created a flow map to teach the process of using the sticky note folder. Flow maps are "brain friendly". They not only develop dendrites, they also allow the brain to take a "snap shot" of the learning. This makes it easier to retrieve the information.
The children each make one of their own flow maps to keep in their reading folder. When they are sharing with their partners, it can provide support as they learn the process.
 Here is what we know:
  • Children should be working with partner to read together in a variety of ways.
  • It is our responsibility to provide the mini lessons to support our children.
  • We are building stamina during partner reading time just like we do for independent reading time.
  • Children should engage in age level appropriate conversation about books.
  • Again, mini lessons are used to model and practice book conversation.
  • Partners are based on like reading ability and language skills.
  • Partners are changed every few weeks. 
Ideas for this blog post come from Powerful Partnerships, Unit 2.
https://www.teacherspayteachers.com/Product/Readers-Workshop-Unit-2-Powerful-Partnerships-by-Kim-Adsit-Michele-Scannell-264926


Pin It!

Monday, October 24, 2016

Making the Most of Unifix Cubes

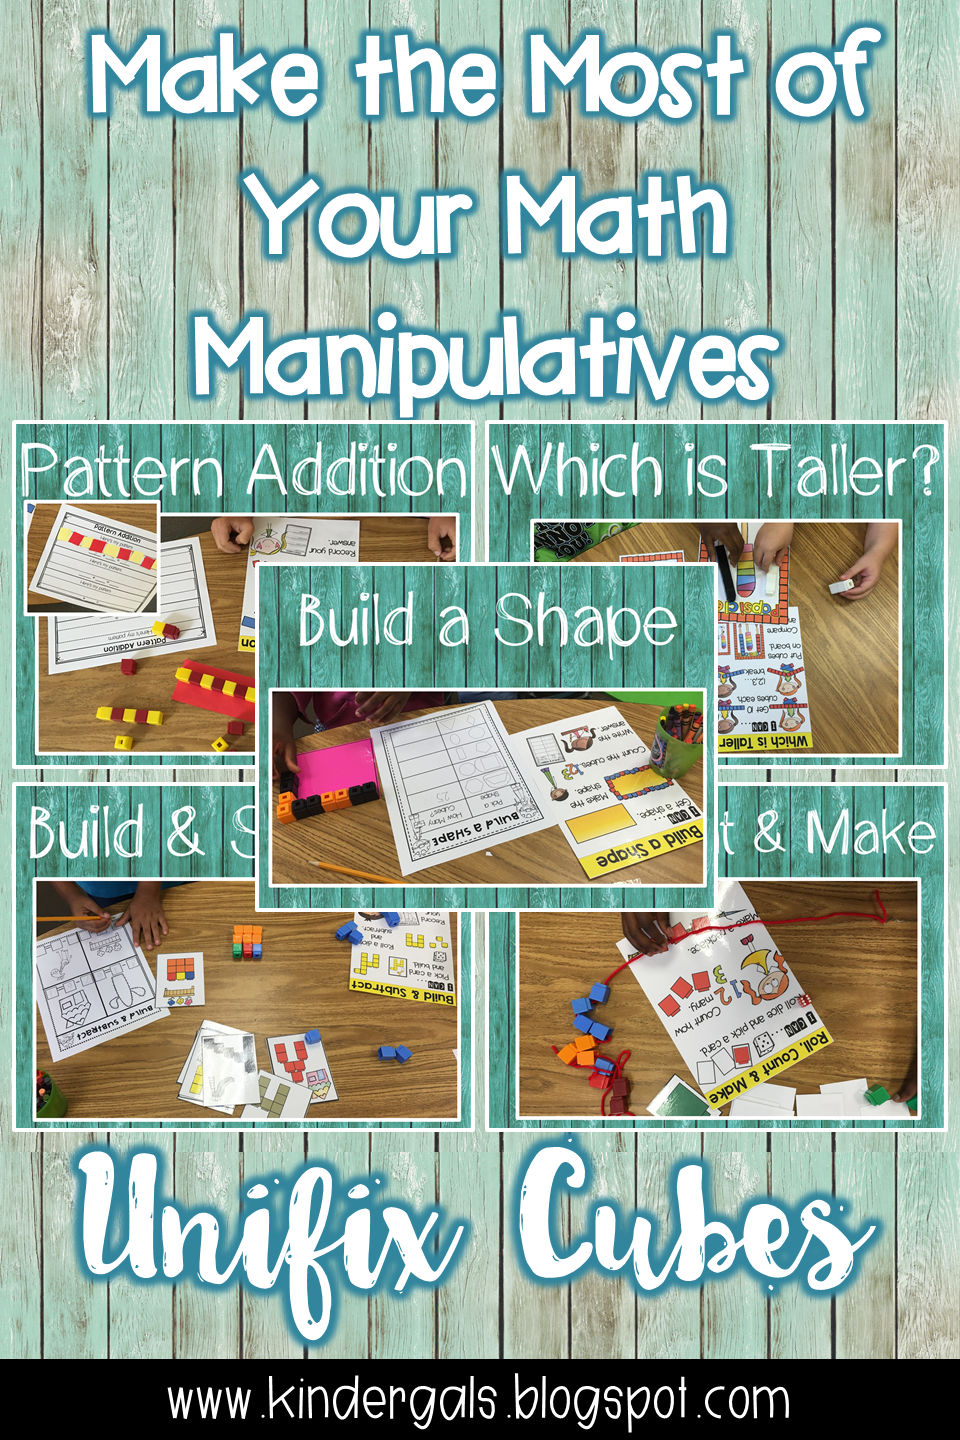
Do you have boxes of unifix cubes stored in your closet? Are you trying to figure out how to use them for more than making patterns? Then, this post is for you! In this post I will share some activities that Michele and I created to teach ALL of the Math Standards!
For each of the 5 mathematical strands I will share an engaging unifix cube activity that your kids can do totally independently! At the bottom of the post, I share how Michele and I ensure success!
First let's look at counting. Here are the standards we used to guide our ideas.
Common Core Kindergarten standard: CC4a: When counting objects, say the number names in the standard order, pairing each object with one and only one number name and each number name with one and only one object.
Common Core First Grade standard: NBT1: Count to 120, starting at any number less than 120. In this range, read and write numerals and represent a number of objects with a written numeral.
NCTM standard for both grades: 1A- Understand numbers, ways of representing numbers, relationships among numbers, and number systems.
This is a super simple activity to practice counting and subitizing.
  • Use a long piece of yarn and a pipe cleaner to make lacing string.
  • Tie a unifix cube to the bottom of the piece of yarn.
  • Invite the children to roll a dice.
  • They count that many unifix cubes to lace onto their string.
  • Consider using a 12 sided dice for counting sets with a larger quantity.
Now, let's look at shapes. Here are the standards we used to guide our ideas.
Common Core Kindergarten standard: KGA: Identify and describe shapes. KGB: Analyze, compare, create, and compose shapes.
Common Core First Grade standard: 1GA: Reason with shapes and their attributes
NCTM standards for both grades: Standard 3A: Analyze characteristics and properties of two- and three-dimensional geometric shapes and develop mathematical arguments about geometric relationships.
To play this game here is what you do.
  • Provide the children with a variety of shapes.
  • Be sure to consider the size of the shape. This will determine how many cubes they will be counting.
  • Invite the children to lay cubes around the edge of the shape.
  • Once they finish, they count the cubes and record the number on the recording page.
Now, let's look at measurement. Here are the standards we used to guide our ideas.
Common Core Kindergarten standard: MD1-Describe measurable attributes of objects, such as length or weight. Describe several measurable attributes of a single object. MD2-Directly compare two objects with a measurable attribute in common, to see which object has "more of"/"less of" the attribute, and describe the difference.
Common Core First Grade standard: MD2 Express the length of an object as a whole number of length units, by laying multiple copies of a shorter object (the length unit) end to end; understand that the length measurement of an object is the number of same-size length units that span it with no gaps or overlaps.
NCTM standards for both grades: Standard 4- 4A: Understand measurable attributes of objects and the units, systems, and processes of measurement. 4B: Apply appropriate techniques, tools and formulas to determine measurements.
This is a great partner game for early finishers. I don't use a recording page for this activity. Here's how you play.
  • Give each child a partner.
  • Each child counts out 10 cubes and snaps them together.
  • Invite the children to put the cubes behind their backs and say, "1,2,3 break."
  • The children each place the unifix cubes in their right hand on the game board,  comparing for taller and shorter.
  • Lay the cubes in the left hand on the table.
  • Whichever child has "shorter", spins the spinner.
  • If it lands on shorter, than the children with the shorter ice cream gets all of the cubes on the game board.
  • If it lands on taller, than the children with the taller ice cream gets all of the cubes.
  • When one child has all of the cubes, he places them on taller.
  • The child with no cubes, spins the spinner.
  • If it lands on shorter, the child with no cubes is the winner.
  • It is lands on taller, the child with all of the cubes is the winner.
Now, let's look at composing and decomposing number. Here are the standards we used to guide our ideas.
Common Core Kindergarten standard: KOA.A: Understand addition as putting together and adding to, and understand subtraction as taking apart and taking from.
Common Core First Grade standard: 1OA.A: Represent and solve problems involving addition and subtraction. OA.C: Add and subtract within 20
NCTM standards for both grades: Standard 1- 1A; Understand numbers, ways of representing numbers, relationships among numbers, and number systems. 1B: Understand meanings of operations and how they relate to one another. 1C: Compute fluently and make reasonable estimates.
Here is an easy activity for composing a number 11-19.
  • Give each child a stem game board.
  • Invite them to use 10 green cubes to make the stem.
  • Roll a dice (1-9).
  • Count out cubes to match the number on the dice. (all one color of cube)
  • Use the cubes to make a flower.
  • Take the flower apart, and place the cubes on the tens frames.
  • Record the number on the recording page.
Now, let's look at adding, subtracting and number combinations. Here are the standards we used to guide our ideas.
Common Core Kindergarten standard: KOA.A: Understand addition as putting together and adding to, and understand subtraction as taking apart and taking from.
Common Core First Grade standard: 1OA.A: Represent and solve problems involving addition and subtraction. OA.C: Add and subtract within 20
NCTM standards for both grades: Standard 1- 1A; Understand numbers, ways of representing numbers, relationships among numbers, and number systems. 1B: Understand meanings of operations and how they relate to one another. 1C: Compute fluently and make reasonable estimates.
Here is how you play.
  • Give each child a ladder fives frame.
  • Invite the children to roll a dice. (You may want to cover the 6 dots with a colored dot.)
  • Count unifix cubes to match the dice.
  • Put the cubes on the ladder fives frame.
  • Decide how many more you need to make a 5 by filling in the empty squares on the ladder with another color cube.
  • Record your answer.
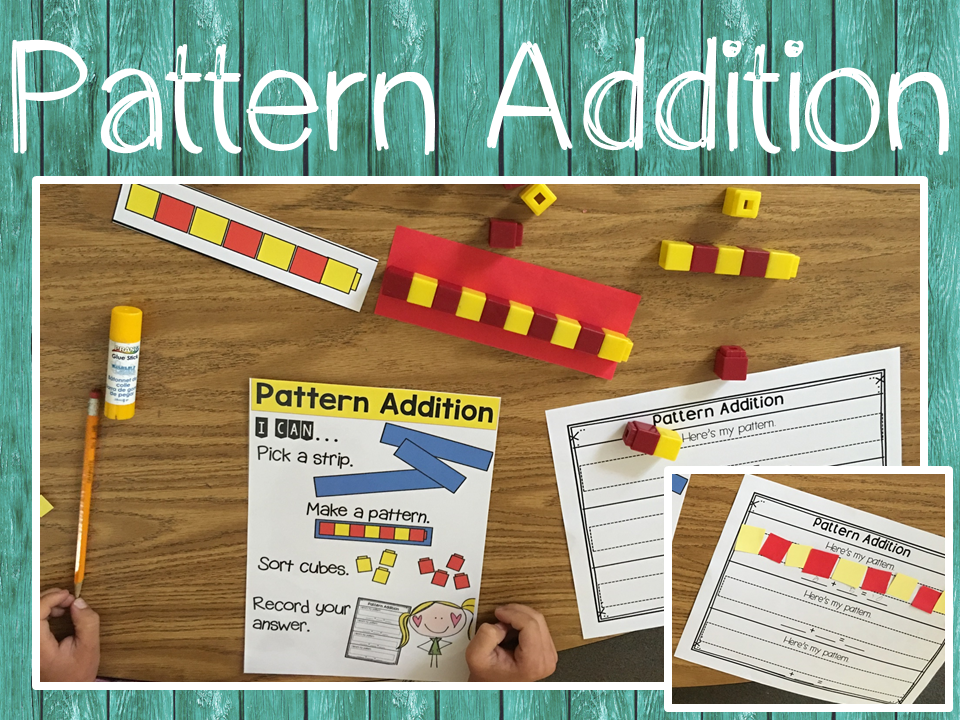
Here's how to use patterns to teach addition.
  • Give each child a strip (no longer than 10 cubes long).
  • Invite the children to select a pattern card.
  • Make the pattern on the strip.
  • Record the pattern on the recording page by gluing down squares.
  • Take the pattern apart and sort the colors.
  • Write the number sentence.
Here's how to play.
  • Invite each child to select a picture card.
  • Use the unifix cubes to make the picture.
  • Count how many cubes and record on the recording page.
  • Roll a dice.
  • Subtract that many cubes from your picture.
  • Finish the recording page to write the subtraction sentence.
Ever share an idea with someone that worked perfectly in your room only to have them tell you it was a disaster in theirs? There are many reasons that could happen, but one that I see a lot is some teachers provide more scaffolding for their kids than others. Teachers that provide scaffolding, ensure the child's ability to engage in meaningful activities independently. Here's how Michele and I do that...
First let me tell you....my friend Michele is super smart! She is the best lesson scripter...hands down! Her plans are so detailed, that we can easily share them with other teacher with very little direction beyond the script! This lesson plan is for one activity!!!!!
Here is how we conduct our math block.
First...I do...this is where the teacher models. So in our activity, Which is Taller?, it would sound like this...

I do (Teacher models):
Tell students that today they will get to do an activity that will require them to work with a partner and to compare two things to see which is taller. Remind students what taller and shorter means by comparing the height of two students in the class. Next ask a student to come up and pose as your partner for this fun activity.
Ask your partner to count out 10 unifix cubes and connect them into a train. You will need to do the same. Show students the taller/shorter mats (hammer and popsicle). Model how you and your partner can put the cube trains behind your backs and break it in two. Each one of you should pull one hand out from behind your back and place that one stack of cubes on the comparing mat (either the hammer or popsicles- you chose). The other part of the ten train should be discarded for now. Next look at the comparing mat and compare the two stacks of cubes. Which is taller? Which is shorter? Next ask students whose stack should win? They will inevitably say the stack that is taller should be the winner, but you should tell them that we have a better way to figure out who will win. We will spin to see who wins! Show them the spinner that corresponds to the mat you chase to use. The person that will spin to determine the winner is the person who had a shorter stack. If it lands on shorter, the person with the shorter stack is the winner, If it lands on taller, the person with the taller stack is the winner. Re-form your ten train and model this several more times.  
Afterward, ask your students to think of what you just did. Call on students to tell what you did first, next, and finally. Now show the students the “I can” chart for this activity and review the steps.
Then, We do...this is where the children try the activity on their own with your support. It sounds like this...
We do (Students do with teacher support):
Now it’s time for the students to try this with your support and guidance. Quickly divide the students into groups of 4 and give each group one tub of unifix cubes. Divide each group into partnerships. Have the students gather around each tub. Give each partnership and comparing card and a corresponding spinner. Ask each student to create a train of 10 unifix cubes. They should
then place the stack behind their backs at the same time and say “break” and break their stack in two. Each student should then pull one hand out from behind their back and place their stack on the comparing mat. Both students should then look at the mat and determine who has the taller stack and who has the shorter stack. The person with the shorter stack should spin the spinner to see who wins. Circulate around the groups and watch as students are playing the game. Step in if students need your assistance or guidance.

Next, You do...this is where the children try the activity on their own with your support. It sounds like this...

You do (Students will work independently):
Now you will allow students to work independently on this activity. Move the student groups further away from each other to help students concentrate when so many are playing at the same time. Remind students to use whisper voices so that they do not disturb other groups. Allow students to continue working with the partner they have been working with or you can mix them up if you choose. Instruct students to continue playing the game that you taught them.

Last, is the closure. This is when you pull the children back together to discuss the activity and resolve any problems. It sounds like this...

Closure (Discuss the activity):
Ask students to think about the activity they just did. How did it go? What went right? What problems did they encounter? Ask student volunteers to answer these questions. Determine how to solve any problems by asking for solutions from the students. (Ex. If a student had difficulty being a good partner, what would the students suggest as a solution?
These activities, and many more, are from our Unifix Cubes unit. You can find the unit here.
https://www.teacherspayteachers.com/Product/Unifix-Cubes-Math-Activities-Unit-2-by-Kim-Adsit-and-Michele-Scannell-2830670


Pin It!
 
Pin It button on image hover

Receive All Free Updates Via Facebook.