KinderGals

Search This Blog

Wednesday, January 18, 2017

How To Use Guided Reading to Teach Nonficiton Features

 
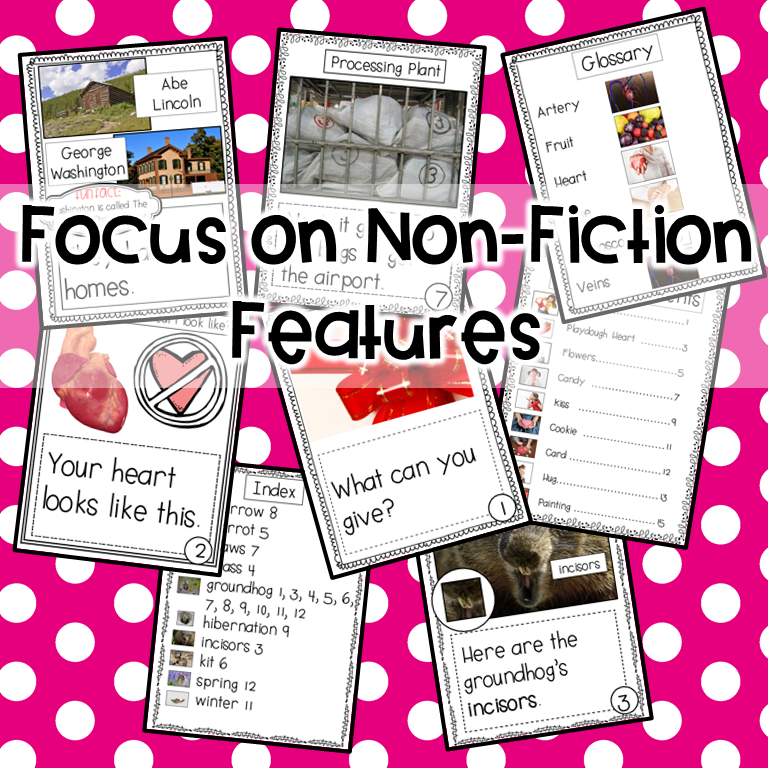
While we do teach a unit on Nonfiction Features during our Reader's Workshop, we found that our kids needed more consistent practice to truly apply and use the features as readers and writers. This post shares how we use guided reading to teach the nonfiction features in a systematic approach.
Guided Reading
Most of the time during guided reading lessons we are using our running records to group kids by their reading level to deliver instruction at their instructional level. But, about once a week we do things a little differently.  Here's what we wanted:
  • We wanted to give our kids a very systematic approach to learning the nonfiction features and to explore how readers use them to collect information thus improving comprehension of nonfiction text.
  • We wanted our kids to be able to apply the nonfiction features in their own writing.
  • We wanted to make a connection between our science and social studies content and reading and writing.
  • We wanted of our kids to have exposure to the same nonfiction features and to the same content.
A Guided Reading Lesson
Here's a sample of a lesson.
Familiar Read Warm Up
First thing we do is a warm up. I give them whatever nonfiction book we used last week. The kids ready independently as I listen in or do running records. You might be wondering if all of the kids are reading the SAME book? I did say that I wanted them to read about the same topics and practice the same nonfiction features.  Since I wrote these books myself, here's what I did.
First, I picked 5 titles for each month. These are the titles from the February Unit.
Then, I used the same photographs and the same nonfiction features, I just changed the level of the text.  My goal here wasn't for a perfect instructional fit. This is more of a strategy lesson--how to use nonfiction features to comprehend the piece.  When choosing a book for each group, I picked a book that they would not struggle with the text. It is better in this case for the text to be BELOW their instructional level than ABOVE it!  While the most challenging text might be too hard for any of your kids, I print this book to use for myself! It has all of the factual information and I can use it to help guide the discussion for their books with limited text.
Word Work
The next thing we do is to visit some of the high frequency words that they will encounter in their new read.  I select 2-3 words that the kids read, make, and write.  Each group will have different words to match the different levels of text.
You can snag up a free copy of this form by clicking on the image below.
https://drive.google.com/open?id=0B7ubnOnZF__xNG9rNzY3Mm11VFE
 Feature Walk
The next thing we do is a feature walk in our new book. Together we look through the pages to find nonfiction features that we have already seen in our previous text.  Then, I call attention to the new nonfiction text feature.  We talk about how to use that as a reader to help us gather more information. We talk about why an author would use that feature. 
 Independent Reading
The kids now read the book independently.  As the kids are reading, I can listen in as individual children read aloud.  Remember the focus here is on how readers use nonfiction text. While I will make note of children who are experiencing difficulty in areas such as applying word attack skills, I will not address these at this time.  These will be addressed on another day.  My focus for this lesson is on using the nonfiction features.  This is hard. I tend to want to chase the rabbit and get off of my intended objective.  I have to keep reminding myself that I am focusing on how readers use nonfiction features.
Practicing Phonics
After reading a book about Thanksgiving, this little guy is sorting pictures by long i or long e. For each lesson, I made several phonics practice pages. That way, I can select the one for each group that I think will work best.
 
Practicing Nonfiction Features
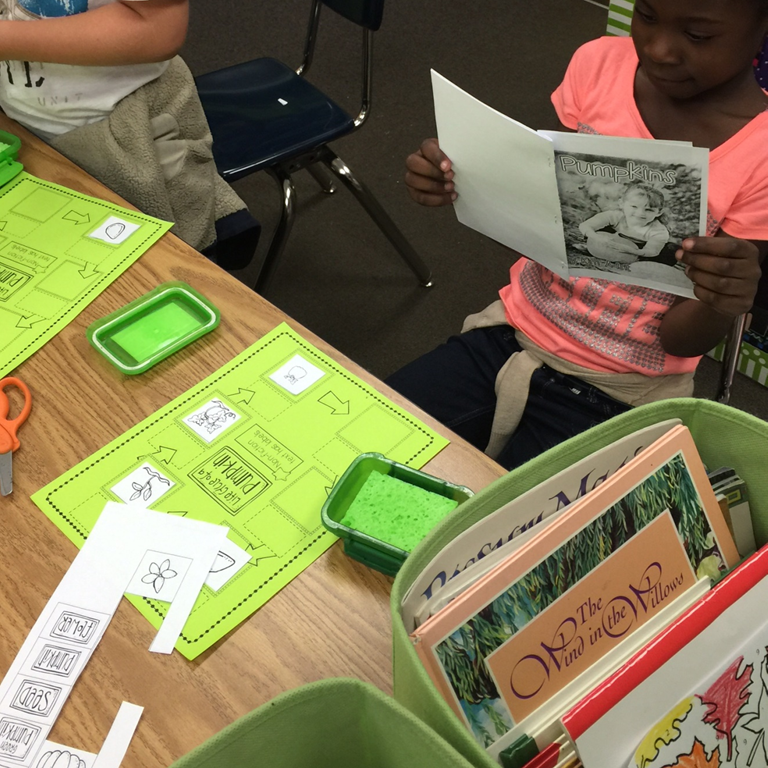
Now it's time to practice the features. The kids use the content from the book to practice the nonfiction feature. We make the book available to the children so that they can go back go the text to check for understanding.
Writing with Nonfiction Features
 
Now it's time to apply that feature to our own writing.  In this book about apples, we were learning about a cut-a-way, a feature used by authors/illustrators/photographers to show us a close up of something in the larger picture.  The kids had to match up the close ups for the nonfiction feature practice. Then, they used that to help them write text about apples using a cut-a-way.
Now, you might be saying, HOLY MOLY how do you fit all of that in and get done in 20 minutes? To tell the truth, sometimes I don't! I lose track of time. I started setting a timer for 20 minutes when I start a group. This helps me keep a handle on how much time I am requiring of them. 
Sometimes I skip the phonics practice and put that as a center instead.
Depending on the group and the time of year, I can often send kids back to their area with the book and the nonfiction feature practice and/or the writing portion. This works well for your higher achieving kids. They are usually able to complete these with little support. Encourage them to help each other when they have questions!  
Since February is fast approaching, here is a link to the February Unit.
https://www.teacherspayteachers.com/Product/Guided-Reading-Informational-Text-February-by-Kim-Adsit-1670400
There is also a bundle that has each of the months included.
https://www.teacherspayteachers.com/Product/Guided-Reading-Informational-Text-All-Unit-Bundle-by-Kim-Adsit-1517840

Pin It!

Friday, January 13, 2017

Winter Fun Math and Literacy Activites

Can I be honest? Winter is not my favorite season. I love warm weather. I live for April to get here, and dread January through March. I'm ok with winter in November and December for the holidays, but then I'm done! However, what I like about this time of the year is what is going on inside of the classroom! The kids are really getting it! They are starting to apply all of the things we have been learning since August. They are reading and writing. They are developing number sense! They are independent problem solving machines! Here are some of the fun ways we celebrate winter while staying warm on the inside!
4 Seasons Tree Map
It takes us 4 days to complete this chart. When teaching kids each of the 4 seasons, it is helpful to show them the differences between each. Each day we learn about one of the 4 seasons. We use interactive writing to record the things that we learn. On Friday, we compare the items for each season on our tree map.
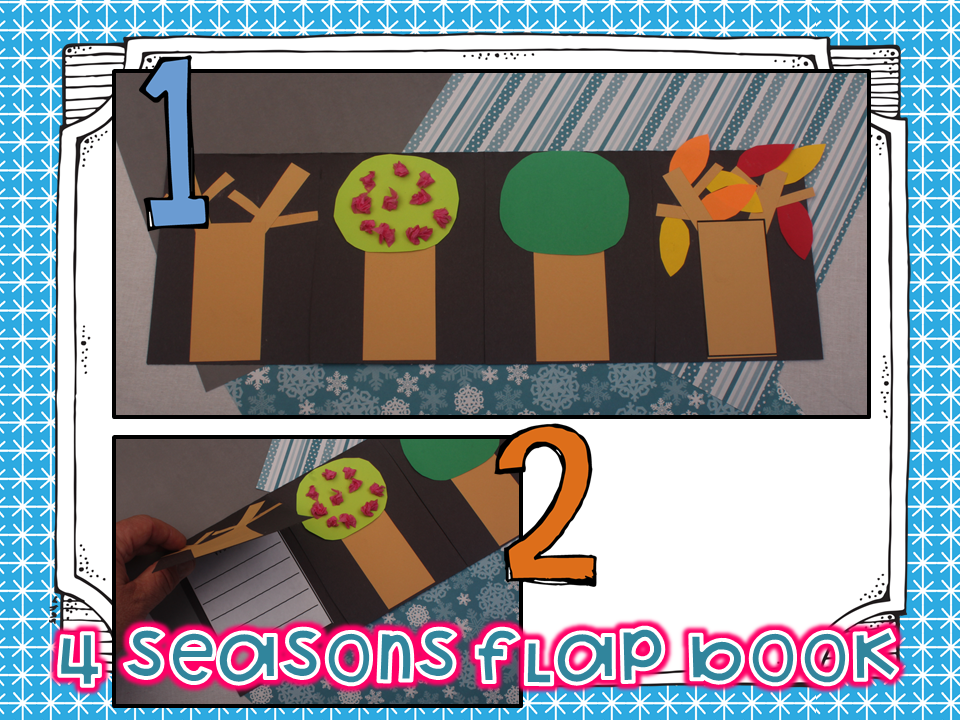
4 Seasons Flap Book
On Friday, the children make their own 4 seasons flap book. Here's how:
  1. Fold a piece of 12 x 18 paper in half.  Cut the top flap into 4 sections.
  2. Use rectangles to make the tree trunks for each season.
  3. For the fall and winter trees, cut smaller rectangles to make the branches.
  4. Round the corners from squares to make the spring and summer trees and to make the leaves for the fall tree.
  5. Add pink tissue paper flower to the spring tree.
  6. Glue a text box under each of the 4 flaps. On each text box, the children record information about the four seasons.
Snow on Me Poetry Book
To make this poetry book:
  • Cut off the first sentence. Put the words in the correct order.
  • I teach the kids to put the capital letter first and the word with the punctuation last.
  • Manipulate the remaining words by placing them between the first and last word.
  • Read the sentence and ask yourself, "Does it make sense?"
  • If not, switch the order of the two middle words.
  • Find the picture to match the sentence.
  • Here's how we do that: Look at the word at the end of the sentence. What letter does it begin with? Look at your pictures and find a word that begins with that letter.
  • Repeat with the remaining sentences.
  • Invite the kids to add this book to their bag of books for repeated practice.
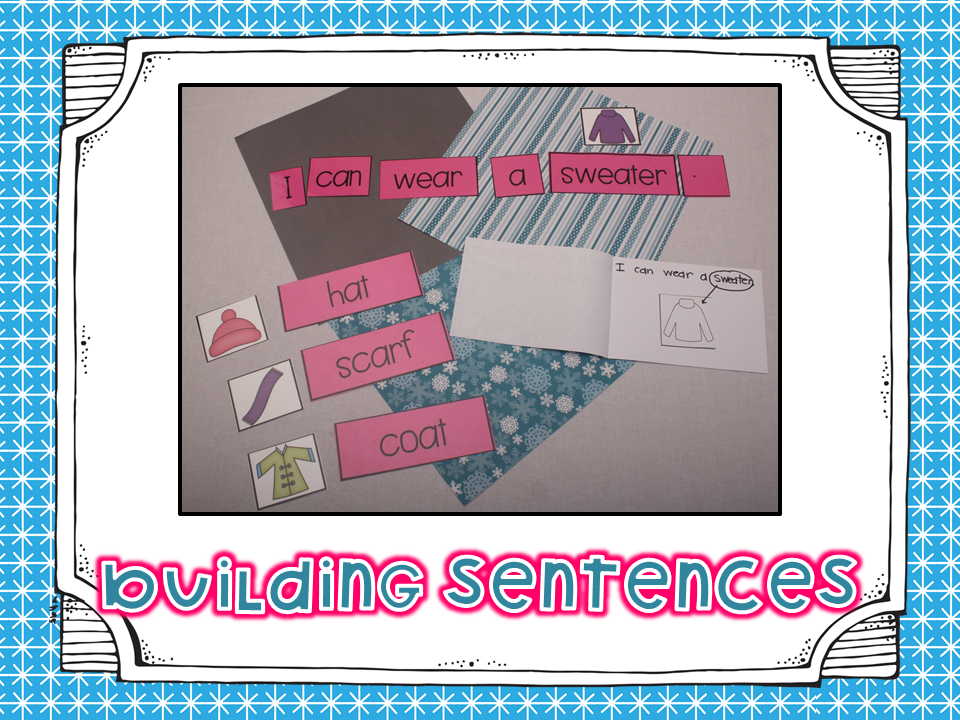
Building Sentences
Here's what we did to make these winter clothing sentences:
  • Match the pictures to the words. (We look at the beginning letter.)
  • Look at the 4 other words and ask, "Which words do I already know?" (We know some words fast.)
  • Using the idea that we are building sentence about clothing that we wear, ask yourself what could this other word be?" (We use our schema.)
  • Build the sentence. (We know the difference between words and sentences.)
  • Record in your book. (We can write a sentence.)
  • Circle the noun that names the pictures. Draw a line to the picture. (We look at pictures.)
Isn't it crazy all that we are teaching using this simple book!?
Making Snowflake -ake Words
Here's how we made our snowflake books.
  1. Display the color pictures in a pocket chart.
  2. Find the beginning sound for each of the pictures. (Yellow letters).
  3. Add the word ending ake to each.
  4. Cut apart the black and white pictures.
  5. Glue one on the first page.
  6. Find the word in the pocket chart and record it in your book.
 
Snowman Buttons Patterns
This activity can be played as a game, or made into a simple book.
To play as a game:
  • Make the snowman.
  • Collect buttons or use button clip art.
  • Invite the children to make a pattern on the snowman.
OR To make as a book:
  • Reproduce the book.
  • Invite the children to color the buttons to match the core at the beginning of the button pattern.
Marshmallow Addition
This is a fun math activity to practice number combinations or addition.
  • Invite the children to record a number sentence on their recording page.
  • Add marshmallows to the mugs to match the number sentence.
  • Write an addition story on the recording page.
Number Line Mystery Game
This is a class favorite. We play the Number Line Mystery Game All.The.Time.! Here's how to play:
  • Make a deck of cards, with 4 different symbols.
  • Make cards 1-10, and a blank card for each symbol.
  • Place the four symbol cards without the numeral in a column.
  • Arrange the remaining 40 cards in an array.
  • Invite a child to turn over any card.
  • They need to determine where that card goes on the number line.
  • In this case, they take the number 10 snowflake and place it on the snowflake row in the 10th position.
  • Move the facedown card in that position and replace it with the 10 snowflake.
  • Now, look at the new card and determine where it goes on the number lines.
  • The game is over when all 40 cards are face up in the correct order.
Winter Clothing RElay
By the end of winter do you have enough winter clothing items to dress an entire class for recess? It always amazes me in April when our principal places all of the winter clothing on tables in the hall. There are coats for days! How can you not know that your child has lost their expensive coat!!!!??? But, that surplus of clothing items, helps me with this fun activity!
  • Collect a variety of winter clothing items and place them into two buckets.
  • Collect clip art images of the different clothing items.
  • Invite two children to select a clothing card from the deck.
  • Ask the class, "Do you think it will take more time to put on the ___ or the ___?"
  • Say, "Ready, set, go."
  • The two children, dress for winter.
  • Who finished first? Did it take him more time or less time?
This is especially difficult for kids. Here's why: Children generally think that MORE means winner and less means LOSER. That means, they think that the child who finished first, took more time!
https://www.teacherspayteachers.com/Product/Winter-Winter-Games-and-Activities-for-Math-and-Literacy-v20-110428
All of these activities are from the Winter Wonderland unit. It has been completely revised with new clip art, frames and fonts. Easy to use patterns and an editable page have been added.  The snowman's buttons game has also been added. If you already have this unit, go to your my purchases section on tpt and download the updated version.
Pin It!

Wednesday, January 11, 2017

Snowman Fun: Math and Literacy Activities for the Little Ones

It doesn't matter if you live in the coldest of cold or the warmest of warm, we all want to talk about snow! It doesn't even matter if you like cold weather or warm weather. There is just something about a snowman that makes us all smile.  Here are some of the fun activities we are doing with our kids to bring a smile to their faces!
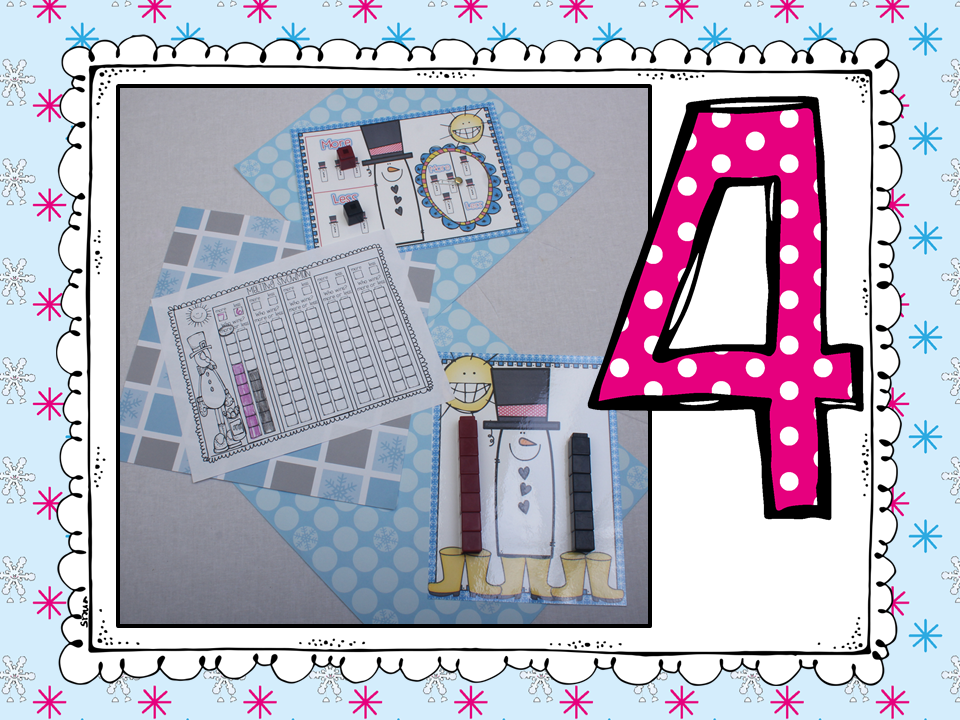
Comparing Snowmen
In this fun comparing activity follow these directions.
  • The children play with a partner.
  • Each partner gets 10 cubes and snaps them together. 
  • Say "1,2,3 break."  Each child breaks their cubes in half.
  • Each child puts one part of their break onto the snowman game board.
  • Compare for more and less cubes.
  • The child with less cubes spins the spinner.
  • If it lands on less, he gets all of the cubes on the game board.
  • If it lands on more, the child who had more gets all of the cubes on the game board.
  • Color the cubes on the recording page.
  • Record how many cubes each child had.
  • Circle more or less to indicate who won.
Snowman Phonemes
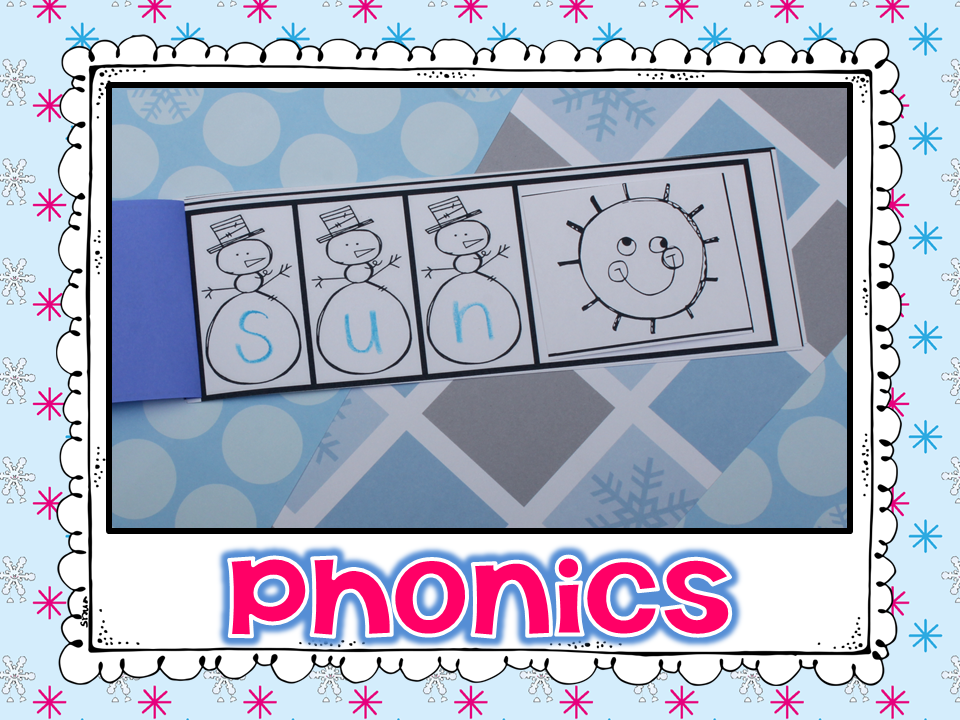
In this fun activity, the children will segment the phonemes in a word.  Here's the questions, what is the difference between phonemic awareness and phonics? A long time ago, a smart teacher told me, "Phonemic Awareness can be done in the dark."  Makes sense, right?  For phonemic awareness we are only dealing with the sounds, not the letters.  In the picture above, coat only has 3 phonemes, even though it has 4 letters.  To play this game the children name the picture. Then, they slide a snowball onto the snowman as they segment each of the phonemes.
Snowman Phonemes
This snowman activity is a PHONICS activity because we are using the letters. In this activity I used only 3 letter words. As the children say they word, they record each letter to represent the sounds they hear.
How to Make a Snowman Step Book
In this fun activity, the children will use this step book to sequence the steps for making a snowman. First, I made a snowman book for each child. To make the book:
  1. Stagger 3 pieces of paper by overlapping them about one inch. (It looks like steps). Fold the paper in half.
  2. Using a pattern, cut the  snowman shape from the folded paper.
  3. Add an additional circle to the top to make a head.
The children follow these steps to make their snowman books.
  1. Cut apart the pictures. Sequence the pictures to make the snowman.
  2. Glue one picture under each flap.
  3. Cut off one of the sentences. Cut between the words.
  4. Put the words in the correct order to make the sentence.
  5. Add a face and a hat!
 Snowman Tree Map
I made this tree map to use during the week. Here's how we are going to use it.
  • Each day we filled out one of the 3 columns.
  • First, we thought of possible ways to finish our sentence.
  • Then, we used interactive writing to record three of the suggestions.
  • As I was writing on the large chart, each child has their own chart to complete.
 Making Snow
During January and February we are working hard on learning to write nonfiction text. One thing we know is that we can only ask kids to write on schema they already have, or schema that is developed through the experiences that we provide. This is a super fun activity for making snow! (Especially for us southerners!)
 Here's what you do:
  1. Use powdered laundry detergent (instant snow) and water. Mix together with a mixer. NOW---it doesn't look like real snow! I know, but my kids have a great imagination and most of them have not seen real snow! ;)
  2. Drop three blobs of snow mixture onto their paper.
  3. Invite the children to swirl their fingers to make the 3 snowballs.
  4. Once dry, use paint to add details.
  5. NOW we are ready to write our procedural piece. The children can write the steps for How to Make Snow or How to Make a Snowman.
 Five Little Snowmen Fat
I made this tree map to use during the week. This is a fun song to teach number combinations. We used the song during literacy to work on things such as print concepts, sight words, beginning sounds, what makes sense, etc. We also used the song as a transition activity while moving from student focused work back to our class meeting area.
 During math we use the song to help us learn the combinations for the number 5.  First let's discuss this standard. Number combinations is found under "Number and Algebraic Thinking". Every wonder why? (Maybe you already know! :)) In number combinations we know the sum and one addend. We know the number for which we are making combinations and one of the numbers. We are solving for "x".  For example, 3 + x = 5.
Here's what we did:
  • I used the color game board and made a black and white board for each child.
  • The children cut the snowmen off of their recording page.
  • As we sing the song, we move the snowmen from standing in the snow to melting in the sun.
  • After singing each verse we record the combination on our recording page.  
  • Select which recording sheet your child are ready for!
 All of these ideas are from Snowman Surprise: Math and Literacy Activities. If you already have this unit, be sure and go to your my purchased and download the updated version. This unit has undergone a major facelift with better graphics, frames, and fonts.  New activities have also been added.
https://www.teacherspayteachers.com/Product/Snowman-Snowman-Games-and-Activities-for-Literacy-and-Math-v20-108177
Pin It!

Wednesday, January 4, 2017

Making the Most of Your Math Manipulatives: Colored Tiles

Making the Most of Your Math Manipulatives: Colored Tiles
Pattern Blocks, Unifix Cubes, Colored Tiles...3 things you will find in most primary classrooms. (or in a storage closet close by! :)) This year I am trying to revisit some of the materials that we find in most classrooms and develop activities to use them! When I am cleaning up the classroom and I have to blow the dust off of a manipulative, that lets me know that I am not getting the most from that resource! Michele and I sat down and planned a few activities to cover each of the math standards using colored tiles.  Here are a few of those activities.
Counting
Frame It! is a fun game! To make the game, we picked some clip art, and put squares around the edge of the picture to create a frame. Laminate the frames. To play the game: invite the children to use two colors to make a pattern frame around the picture. Then, they sort and count each color. If you want to use a recording sheet, invite the children to count the tiles and write the numerals by each color.  (You could also have them compare the numerals!)
Data
To practice collecting and analyzing data, use the fun activity! To make the spinner, slip a brad through a paper clip.  Insert the paper clip into the laminated cardstock spinner. To play the game, invite the children to spin the spinner. Each time the spinner lands on a color, the children place a tile that color onto their graph. When one of the colors reaches the top of the graph, stop! On the recording page, the children draw their graph and analyze the data.
Shapes
For this activity, we wanted the children to look at various shapes in the environment. We went through our photographs and found pictures of shapes in the environment. Laminate. To play, the children use colored tiles to cover the shape. If you want the kids to use a recording page, have them count how many squares it takes to cover each photograph.
Addition/Number Combinations
This is a great game to practice number combinations! Using each child's target number, invite them to count that many tiles to make a design.  They will want to limit the tiles to 2 different colors. If you want to use a recording page, invite the children to use paper squares to copy their design. Now write the number combination.  Then, they think of another way to make a combination for that number.
Subtraction
To practice subtraction you can play this fun game.  To make the game, you will need various design cards, each with a different number of tiles (6-10).  Invite the children to select a card and build the design. Now, roll a dice. Subtract the number of tiles indicated on the dice from the design. To record the equation, the children glue the colored tiles in their book to make the design. Then, using a crayon or pencil, cross of the number indicated by the dice. Write the equation.
Compose & Decompose Numbers
Here is a way to practice composing and decomposing numbers 11-19. Make a spinner with two different colors of tiles. Invite the children to spin the spinner. Which ever color it lands on, they add that color of tile  their double tens frame. They keep spinning until one of the tens frame is full. In this photo, green was full first. Then, the children record their answer by coloring the tens fames to match theirs and recording the numeral.  (Typo in example:  It should say Decomposing Number! Thankfully Michele caught it before we published our unit!) 
 
https://www.teacherspayteachers.com/Product/Colored-Tiles-Unit-3-by-Kim-Adsit-and-Michele-Scannell-2937047
 
Pin It!

Monday, January 2, 2017

Magnetic Letters: Long Vowels, Blends and Diagraphs

One thing every teach has is magnetic letters. But really, what is exciting about a magnetic letter?  They can easily find themselves in a corner, easily ignored by kids. With all of the other exciting centers, I probably wouldn't pick them either! Since our kids NEVER choose to work in that center, we decided to add a few activities to encourage them to select this work station. Here are a few of those ideas. 
Which Doesn't Belong?
To play this game, the children select one of the cards. Then, they find the magnetic letters to match the ones on the card. Invite the children to look closely at the letters. Ask, Which letter doesn't belong in the group? In this case, the "n" doesn't belong. It is the only letter with both curved and straight lines. NOW....if they pick a different letter and can justify it, great! There can be more than 1 right answer!
Beginning Sounds: Blends & Diagraphs
Earlier in the year I created an activity similar to this one except it was just for the beginning letter, not a blend or diagraph. Here's my thinking...I can't be everywhere in the room. I want to create centers that can easily be modified to address a new or more difficult skill, but the activity is the same as a previous center!  This helps my kids to be more independent in stations! When I made the activity, I can either leave it as cards (like on the left) or cut them apart to have separate cards (like on the right). When I made the cards, I put the empty boxes at the beginning of the card to remind the children we were looking for beginning sounds.
Ending Sounds: Blends & Diagraphs
To make a set of ending sound cards, I simply went through my clip art looking for a picture for different ending blends and diagraphs. When I got stuck, I googled "ending sound diagraphs or ending sound blends". This would give me a list of possible clip art pictures I could look for.   
Put the empty box at the end of the card to remind the children we were looking for the ending sounds. I didn’t stress about there not being a card for every letter. Many letters do not appear at the end of words where they produce their own sound!
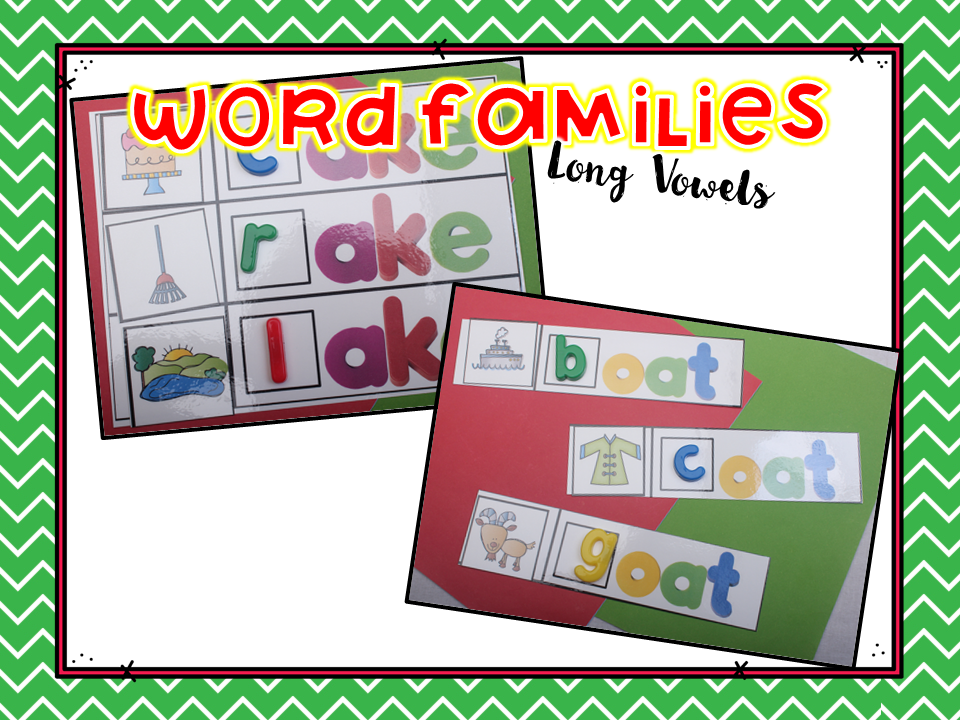
Word Families: Long Vowels
When working with word families, consider using the CVCe spelling pattern first. This pattern is easier for the kids to see. They catch on to the idea that by adding an "e" to the end of the word, you can now make the long vowel sound. Be sure and make cards for each long vowel.  You will find that some long sounds and not represented in each of the spelling patterns.
Long Vowels: CVCe
Select one of the CVCe game boards. The pictures all contain the same long vowel sound. Invite the children to stretch the sounds to spell each word, adding an "e" to make the long vowel.
Long Vowels: CVVC
Select one of the CVVC game boards. The pictures all contain the same long vowel sound. Invite the children to stretch the sounds to spell each word. These can be trickier. For example, the long "e" can be made with "ee" or "ea".
Word Ladders
Word ladders are a lot of fun. To play the game, invite the children to select a card.  On each card, the children make the first word. To make the second word, the children will change only one letter in the first word. For example, they started with bike and changed the “i” to an “a” to make bake.  As the children work down the card, they will change the letter in 3 positions of the word (not the final position, it will remain an "e" each time).
Magnify It
Give each child a magnifying glass and one of the sight word cards. The children use the magnifying glass to look at the tiny word on the card. They lay the card down and use magnetic letters to make the word.
When children are learning a new word, here are the steps to follow:
1. Show the child the word.
2. Discuss the word.
3. Mix up, or cover up, the word.
4. Have the child use magnetic letters to make the word..without looking at the word.
5. Show the child your wod and compare their word to yours.
6. If they don't match, try again from the beginning.
These steps train the brain to look at the word as a unit and not at each individual letter.
https://www.teacherspayteachers.com/Product/Magnet-Letters-2-Literacy-Fun-with-Magnetic-Letters-by-Kim-Adsit-2937053

All of these are from the Magnetic Letters 2 Unit.
You can find a video of these activities (here).
https://www.teacherspayteachers.com/Product/Magnet-Letters-Literacy-Fun-with-Magnetic-Letters-by-Kim-Adsit-2873251
Magnetic Letters (Short Vowels, Beginning and Ending Sounds, Letter Sorts, and Letter Order) Unit 1
You can find a video of these activities (here).

Pin It!
 
Pin It button on image hover

Receive All Free Updates Via Facebook.