KinderGals: July 2018

Search This Blog

Thursday, July 12, 2018

Top Ten Organization Tips

Organization! Does it come easy for you or are you constantly trying to organize? Organization is important because it CAN increase instructional time! This blog post shares my Top 10 Organization Tips that will be sure to save you time!
Organization Tip Number 1: Organize student materials for easy access.  Carpet Bags have changed my life! Since our kids do not have assigned table seating, the carpet bags are an organizational system that allows the children to keep up with all of their supplies.  In the morning the children remove their bags from the baskets and place them on their carpet squares. The carpet bags hold all of the supplies that we are use during any large group instruction.
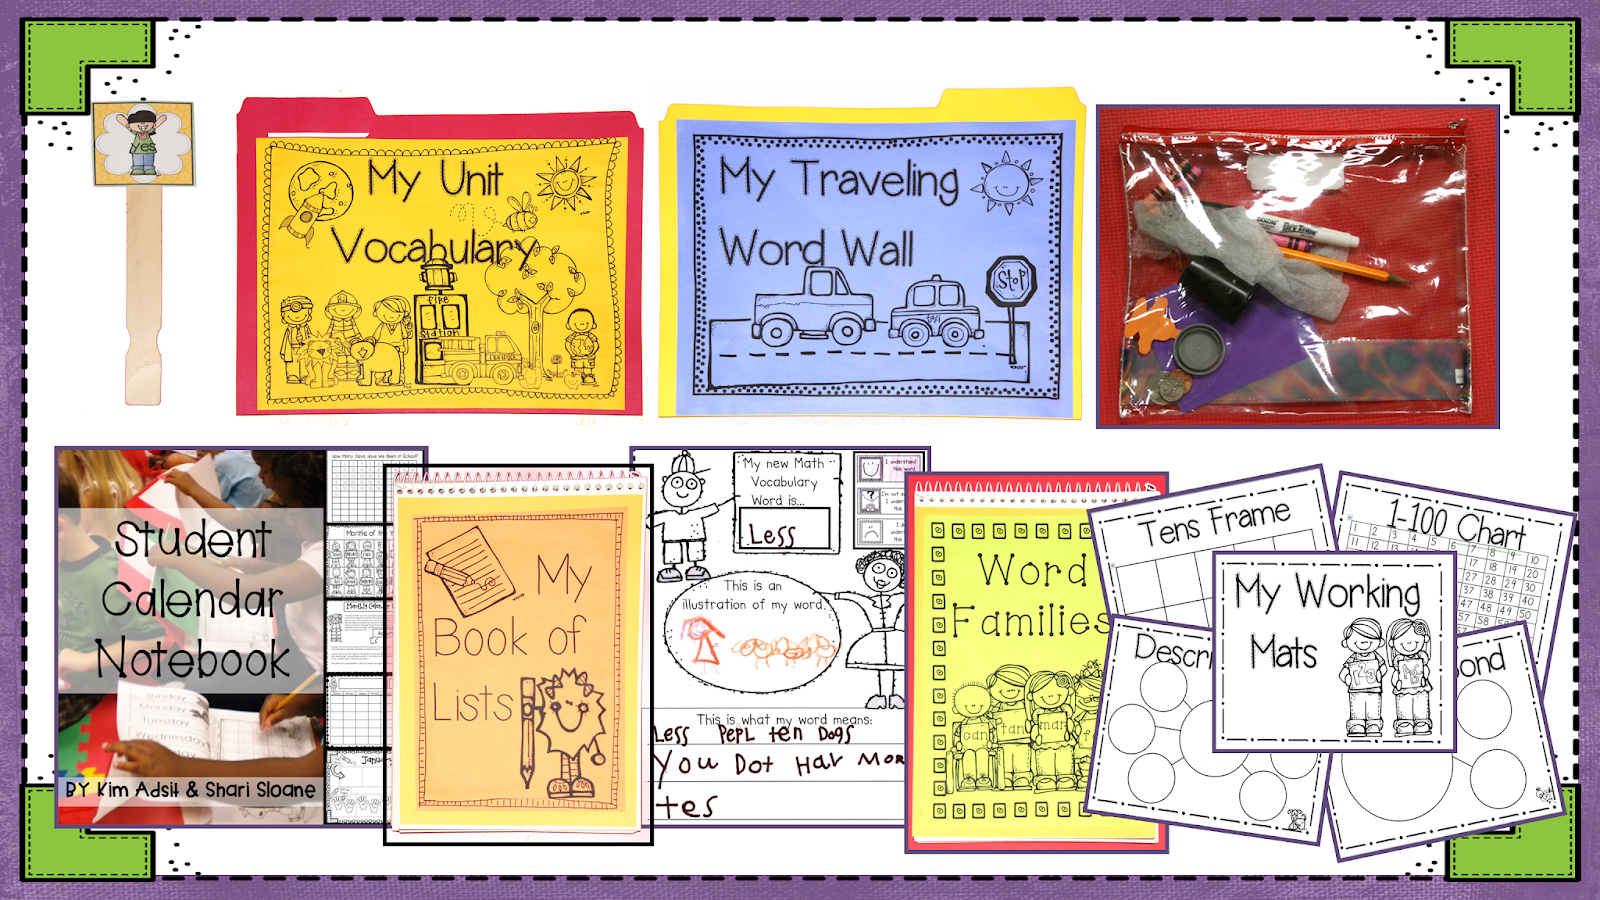
Here are some of the items we store in the bags. Carpet bags can save you tons of time! For example, if we are going to use a tens frame during math, we invite the children to look in their carpet bags and get out their spiral bound working mats and their collection of counters! Wala! Just like that, they are ready to begin instruction.
You can read about all the individual items we keep in the carpet bags in this blog post
All of these items, except for the calendar, are in our Pack It! Learn It! unit.  You can find it here.
The Pack It! Learn It! unit
The calendar notebook
I'm not going to lie, sometimes it looks like this! But I'm telling you, it is worth it!
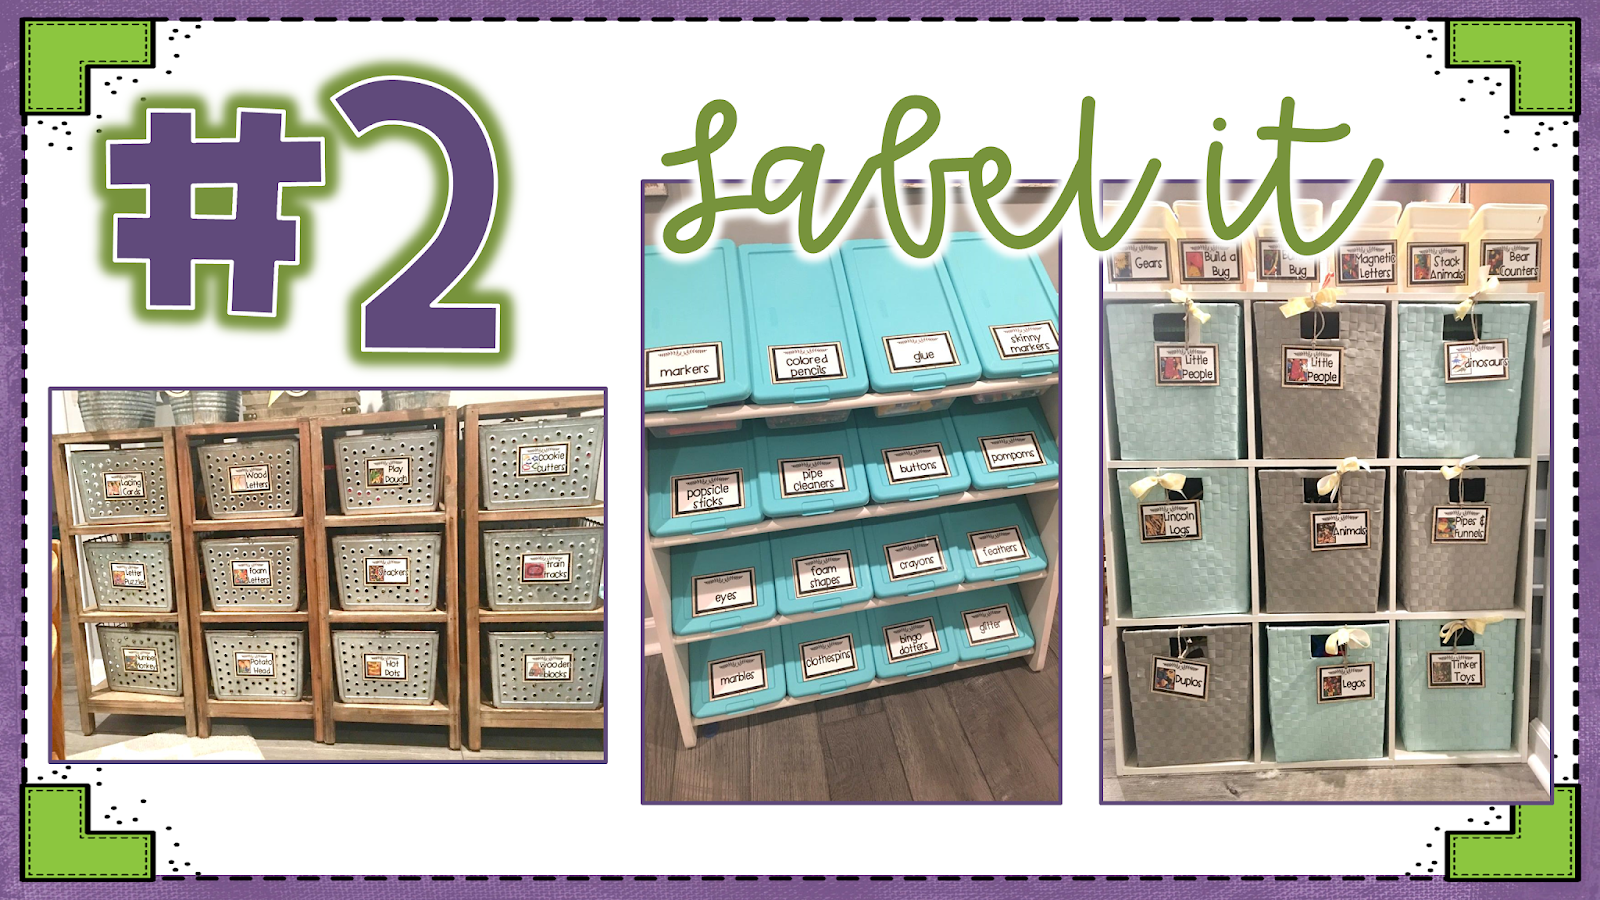
Organization Tip Number2: Label materials for kids! I used Erica Bohrer's farmhouse labels to begin. Then, I just took my camera and snapped a picture of the things that are inside of each tub. I added the pictures to the label.  This makes it super easy for the kids to clean up independently.
I also label my resources. These tubs contain the math activities I use for each of the strands. They include the activities for the Math Manipulatives and for the Small Group Math Activities.  These units can be found here:
Math Manipulatives Bundle
Small Group Math Bundle
Organization Tip Number 3: Take advantage of hidden storage to hide your clutter.  By adding a curtain to hang over the open shelving, I can hide all kinds of things!
Don't forget to use your closets wisely. Label items and place them in clear storage or put a picture on the outside.  It makes it easier for the eye to find the needed items.
Organization Tip Number 4: Organize your daily materials.  We have a drawer for each day. On Friday, we fill up the drawers with ALL the things we will be using the following week.  Then, each morning all we have to do in remove the items from the drawer and we are ready to go.  The second stacker holds materials that need to be prepped, need to be put away, or are ready for us to use! Volunteers can help by removing items from the To Make drawer. As they finish prepping, they just move the items to the Ready drawer. I use the Put Away drawer to hold the things I am finished using until I have time to put them away correctly. This keeps the items from being stacked around the room. You can grab these labels for free at the bottom of the blog post.
Organization Tip Number 5: Repurpose Items. Placemats are great to define work spaces. When the children are engaged in an activity with lots of pieces, a placemat helps them keep up with what is theirs and what belongs to their neighbor.  A baby shoe bag works great to hang onto the back of your easel. It can hold all of the things that you use while charting! And, a rolling laundry basket makes a great container to hold all of your big books!
Organization Tip Number 6: Have a Panic Shelf.  Really this shelf should be called the "No need to Panic" shelf.  This shelf holds all of the things that I use during large group time.  It holds a set of magnetic letters, calendar pieces, transition tools, helper supplies, etc!  No longer need to hunt for these items! They are right there waiting on you!
Organization Tip Number 7: Organize your classroom library! Making books easy for kids to find is essential to positive experiences while shopping for books. You can read all about how we make that happen in this blog post.  This blog post also has some free labels and tags to help you with your leveled libraries.  You can find our interest or topic tags here.
Organization Tip Number 8: Find places for all of the small items! We love these storage containers we picked up at Wal-mart.  They are great for organizing all of your letter sets. These are our magnetic letters, but we also use the same kind of unit for foam letters, overhead tiles, etc. This makes it super easy for the kids to quickly find the letters they need to make words.  The other contain, the one with names, hold photos of each child. I take their pictures at the beginning of the year. Then, I reproduce copies of their photos and store them in the drawers. This makes is easy for the kids to make an All About the Author page in their writing. We also use them in other activities like counting, sorting, number combinations, etc!
Organization Tip Number 9: Rethink your seating.  Flexible Seating is a big buzz word right now! You can read about our take on flexible seating in this blog post.  When thinking seating, think storage at the same time.  We store our units in the sterile plastic tubs.  I took a few extra lids and cover them. Then, when we start a new unit, I simple remove the lid and add one of the covered lids! Now they make great seating options! OR how about paint buckets?! These buckets make great seating options and are great for storing things like headphones!
Organization Tip Number 10: label the areas in your classroom.  We have 5 areas in our classroom.  Each area contains different types of seating, different activities, and different things to look at! The kids rotate through the room spending one day a week in each of the 5 areas. This keeps the surroundings new and stimulating. We label each of the items that belong in the area. This helps kids get things put back to where they belong during clean up time!

Pin It!

Wednesday, July 11, 2018

Comprehension...Kindergarten Style

Let's talk comprehension....
There are many things going on in a kindergarten class while we are teaching kids to read. A beginning reader is learning how text works, how to quickly read sight words, and how to use  strategies to solve unknown words.  The first several levels of guided reading provide little opportunity for comprehension.  Let's face it...there isn't a lot to comprehend in, "See the dog. See the cat. See the bird.  See the pets."
However, at the same time, we are also sharing many selections of text with kids through read alouds and shared reading.  THIS is where we can work on comprehension! Here are a few things to keep in mind...
To be a fluent reader, two things are happening:
1. Children are developing accuracy and automaticity.
2. AND they are developing prosody. Prosody is the natural rhythm that comes with good reading.
To develop prosody we need to read wide and deep. Read the same pieces many times and read many different pieces. AND we need to say rhymes, sing songs, and engage in rhythmic activities.
Retelling is evidence of comprehension! Here are some fun ways to teach retelling!
After reading The Three Bears, the children are using the flow map to retell the story. When teaching retelling, we want to teach STRATEGY over STORY. The children might never read The Three Bears again. BUT, they will read many other selections of literature where a character travels through the story as the setting changes. SO, if we teach kids that if good readers sequence the settings as they appear in the story, they can use that to retell! Now, they can use that strategy in many selections of text, not just The Three Bears. We are teaching children to be Strategic Readers!
Love these little half-page books.  Simply round off the top corners of the booklet. Add eyes, ears, etc to make a character from the story.  Attach Goldilocks, the character that travels through the settings in the story, with a piece of ribbon, yarn, or string.  Invite the children to draw the settings on each page of the booklet. Now, they can retell the story as they turn the pages and place Goldilocks to the setting! Here's another important nugget....there is no need for children to try to remember or guess the sequence of settings. Instead, we want to teach children to go back to the text to find the evidence to support the sequence! This means, the text needs to be available!
Another way to retell, use a flow map and invite the children to draw the sequence of settings.
Or, depending on the child or time of year, the children can use their words to retell the story. The Three Bears Activity is part of our Reader's Workshop Series.
The Itsy Bitsy Spider provides another opportunity to practice this strategy. In the nursery rhyme we all know that the spider crawls on the water spout, but there are many things a spider can crawl on. I went through my clip art and collected all of the things I thought a spider might crawl up.  I made each one into a necklace. Then, I collected a dollar store spider, made a sun, and made a rain wand.
I invited children to "wear" the various settings. As we repeat the rhyme (repeated reading develops prosody), I manipulated the spider, sun, and rain wand. 
You can then invite the children to select three settings for the spider. Draw the settings in each frame of the response page. Tie a spider to the paper using a piece of string, yarn or ribbon. The children can repeat their rhyme as the spider travels through the various settings.
This activity, as many as others, are included in our Retelling Unit.
Here is a fun book that you can use to start the year! In this story, I Know An Old Lady Who Swallowed Some Books, we teach the children to sequence the events of the story just like we taught them to sequence the settings. Once they have the events in order, retelling the story is super easy! I used a clip art image of an old lady's head. Then, I cut out the mouth and glued to the front of a bag. Cut out the mouth in the bag. Now, as you retell the story, "feed" the events into the mouth.
We made a smaller version in black and white for the children to use to retell.  Once you have finished the activity don't be so quick to send home the prop. Instead, place the retelling activity inside of their bag or box of books. Invite the children to use the prop to retell the story during read to self and read to others. You can grab the Old Lady Who Swallowed Some Books as a free file below!
 

Pin It!

Tuesday, July 10, 2018

First Aid for Kindergarteners: Literacy Interventions

Interventions...everyone is looking for them! My intervention session is always one of my highest attended conference sessions. This blog post shares some thoughts on intervention and shares a few of my favorites!
There are three simple questions to ask yourself when you are thinking about applying an intervention:
1. What do I want the kids to know?
These are the power standards. Not all standards need an intervention! Think about the most POWERFUL standards. Which standards are going to be built upon? Which standards are essential for success on future standards? These are the standards for which you plan an intervention!
2. How do you know if you kids have mastered the standards?
This means assessments! UGHHHH yet another test??????  Not really...formative assessments are ongoing! They are used to help you determine what you need to reteach, not teach, or think of another way! I wanted an easy way to keep up with all of this data! Wala! ESGI! You can do all of that right through ESGI!
For example, here is an easy way to assess the alphabet.  You simply use the ABC test! All you have to do is show the kids the screen on the device and ask them to name the letter. You simply click yes or no!
Then, it will give you information on individual children or on the WHOLE class! Good news! You can try it for free for TWO full months! What a great way to get all of you back to school assessments done quickly! Here's even better news... if you sign up for the FREE trial using promo code ADSIT, you are also entered to $50 Amazon Gift Card or the GRAND PRIZE of a $500 Amazon Gift Card! Just go here, use promo code ADSIT, and you will be registered to win!
3. What do you do if they don't master the standard?
This is where we plan the intervention! Here are a few easy to use interventions!
Love these alphabet intervention tub activities!
My friend Michele and I came up with 10 different activities for teaching the alphabet!
We made a folder for each child to hold their alphabet activity cards.
We collected the items they would need to complete the activities and placed them inside of a zipper pencil pouch.
Then, we made a 2 gallon bag to hold the folder and pencil pouch for each child. To decide which cards to put in the folder keep this in mind. The brain learns best when there is a 70/30 ration. This means that the student already knows 70% of the information and only 30% of the information is unknown. Therefore, the bag will hold activities for letters they already know AND for letters they are learning! (Just use your EGSI data to figure this out easy peasy!)


One of the kids favorites...Bend It! Here the kids use pipe cleaners to bend to form each letter!

Another favorite...Roll It! The kids use the playdough to roll the letters.  You can grab the playdough letters free in this blog post! The blog post also shares the other activities! These ideas are from our Interventions Bundle.
One of my favorite abc strategies is this alphabet book idea adapted from a Reading Recovery Strategy.  You can grab this book as a FREE FILE at the bottom of this blog post.  Use this cover to make an alphabet book for the child.
These are the pages that go inside of the book.
Invite the child to cut apart the pictures and put them inside a baggie.
Using your ESGI data, add pictures to the pages that contain the letters the child is able to identify! They don't have to know BOTH the capital and the lower case, just one or the other.  Once the pictures are added, it's time to add the new learning.  Select 3 more letters that you would like for the child to learn. Glue pictures on those three pages.
Now, it is time to read the book.  As the child reads the book, skip the pages without the pictures. When they get to a page with a picture, invite the child to point and name the capital and lower case letter and the picture. If a child doesn't know the letter, you model reading and have the child copy you.
As the child learns a letter, add another picture to one of the pages that do not contain a picture!
This strategy works best when the child reads you the book EVERY day!
 
Here's the most important part...who uses the book?  I mean, how do you decide for which children will this strategy be the most successful.
Some children, those knowing around 18 capital and 15 lower case (just an example), do not need to do this book.  They will learn the alphabet through your regular activities of songs, charting, games, etc!
Some children are not ready, yet! The children that do not understand there ARE letters and they have names, are not yet ready! They need time to just come to school.  They need to sing, hear stories and engage in printed text. However, this is often who we try strategies with! If a strategy isn't working, the child probably isn't ready for the strategy!
This intervention works best with the kids who know a few letters---maybe around 7! These children will learn the names of the letters quickly!


Pin It!

Monday, July 9, 2018

DI For the Little Guy

I love when I get to present a full day session.  Today, at the I Teach K Conference in Vegas, I am presenting a full day session called DI for the Little Guy! This session is packed full of easy ways to differentiate your instruction without having to plan TONS of activities. DI isn't about planning all of those activities. It is about providing opportunity for each child to work at a level, rate, and interest to ensure success.  When we establish centers and implement the workshop model of instruction...differentiation can occur with little extra work from the teacher. Here are a few of the ways that I share in the session.
Formative Assessments
Formative Assessments are the backbone of Differentiated Instruction! Yet, who has time for yet another test! There are many ways to incorporate formative assessments right in your teaching!
One way is to select an instructional focus for each week. That doesn't mean that this is what you are teaching, it means that is what you are looking for evidence of! For example, if you have chosen rhyming as your instructional focus, look for children playing rhyming activities, doing a rhyming activity at your small group, or reading a rhyming book to the class. If you notice YES, they can rhyme, record it on the spreadsheet. You can grab a variety of DI forms at the bottom of this blog post.
If you are looking for a way to document easily and quickly, just use your phone and snap a picture. It is easier to SHOW parents than to try and explain the standard!
Of course my favorite way to collect Data, ESGI! I love that ESGI will quickly make your instructional groups! It saves me tons of time and makes it really easy for me to know just the right thing to teach to each group! Good news! You can try it for free for TWO full months! What a great way to get all of you back to school assessments done quickly! Here's even better news... if you sign up for the FREE trial using promo code ADSIT, you are also entered to $50 Amazon Gift Card or the GRAND PRIZE of a $500 Amazon Gift Card! Just go here, use promo code ADSIT, and you will be registered to win!
Reader's Workshop
In Reader's Workshop, one thing we want to develop is that kids see themselves as readers. In order to do that, we use this anchor chart to teach children there are many ways to read a book. Let's talk anchor charts for just a minute: Some might look at this and say it isn't an anchor chart it's a poster. I can see why they would say that. BUT, here's the truth about anchor charts:
  • Anchor charts bullet the new learning. Kids are not deciding what is written, the teacher is.
  • Anchor charts are used by both the teacher and the students as a reference.
  • Anchor charts are made with kids.
WAIT, put on the breaks. This chart looks like it was made at the dining room table. AND it was! I have issues with my handwriting and rewritten chart, to make them look nice, are not the answer. Children lack ownership of rewritten charts. They don't have an interaction with that chart! Here's what I do. I make the chart ahead since I know my bullet points. I display the chart and cover up the sentences. Each day we do the reveal! I lower the paper to show today's teaching point.
Since this chart has 3 bullet points, that means it is going to take me 3 days to cover the content.  The first day our mini lesson is all about reading a book by telling a story you already know.
The second day we learn all about reading a book by looking at the pictures.
And the last day we learn that we can read a book by reading the words.
Now, it is time to shop for books.  I pull out all of the books used in the previous 3 lessons. These are the books the children were using during the active engagement part of the lesson. I spread them out on the floor and let the children shop! The each select books from all 3 categories so that they have around 6 books. Then, we put the books in their "book baggie".
Now that they have their book baggies, the next series of lessons teaches the children what to do when it is time for them to go and read independently.  The books in their baggies are swapped about every two weeks. As the children begin guided reading, these books can also be added to their bags.
Of course, before any of this can happen this anchor chart will help you establish the expectations for large group instruction. You can grab the pieces to make this anchor chart at the bottom of this blog post. All of these items come from our Reader's Workshop Series.
Writer's Workshop
This is a great blog post on how to establish Writer's Workshop. Here is our Writer's Workshop Mega Bundle.
Literacy Centers
And here is a blog post that will share exactly how we do literacy centers to build independence so that we can pull small group for differentiated instruction! You can grab the Literacy Centers for the Year Bundle in Deanna Jump's Store.
Math Centers
Here is a blog post all about establishing math centers that help children maintain their learning in centers while you pull for small group differentiated instruction. There are several math resources that can help you. You might want to check out the DI Small Group Bundle.  Another useful resource is the Math Game Pack Mega Bundle. This will give you math games for the WHOLE year.  And lastly, be sure and check out the Math Manipulatives Bundle.
Pin It!
 
Pin It button on image hover

Receive All Free Updates Via Facebook.