KinderGals: January 2018

Search This Blog

Saturday, January 27, 2018

February Games and Activites and a FREE Game!

I like February for so many reasons.  It's the time of year that you really start to see the fruits of your labor--not just academically but also socially. The kids have developed deeper relationships with each other, they have learned to depend on each other, and developed a few friendships that will take them into adulthood. (It's also the time when you are tired of cold weather, flu, and being inside, but trying to stay positive! haha)
Here are some of the fun activities we do during February to celebrate Valentines Day!
Heart Measurement
This is a fun craftivity for teaching measurement! After making the paper doll, the children use various items to measure "how much I  love you."
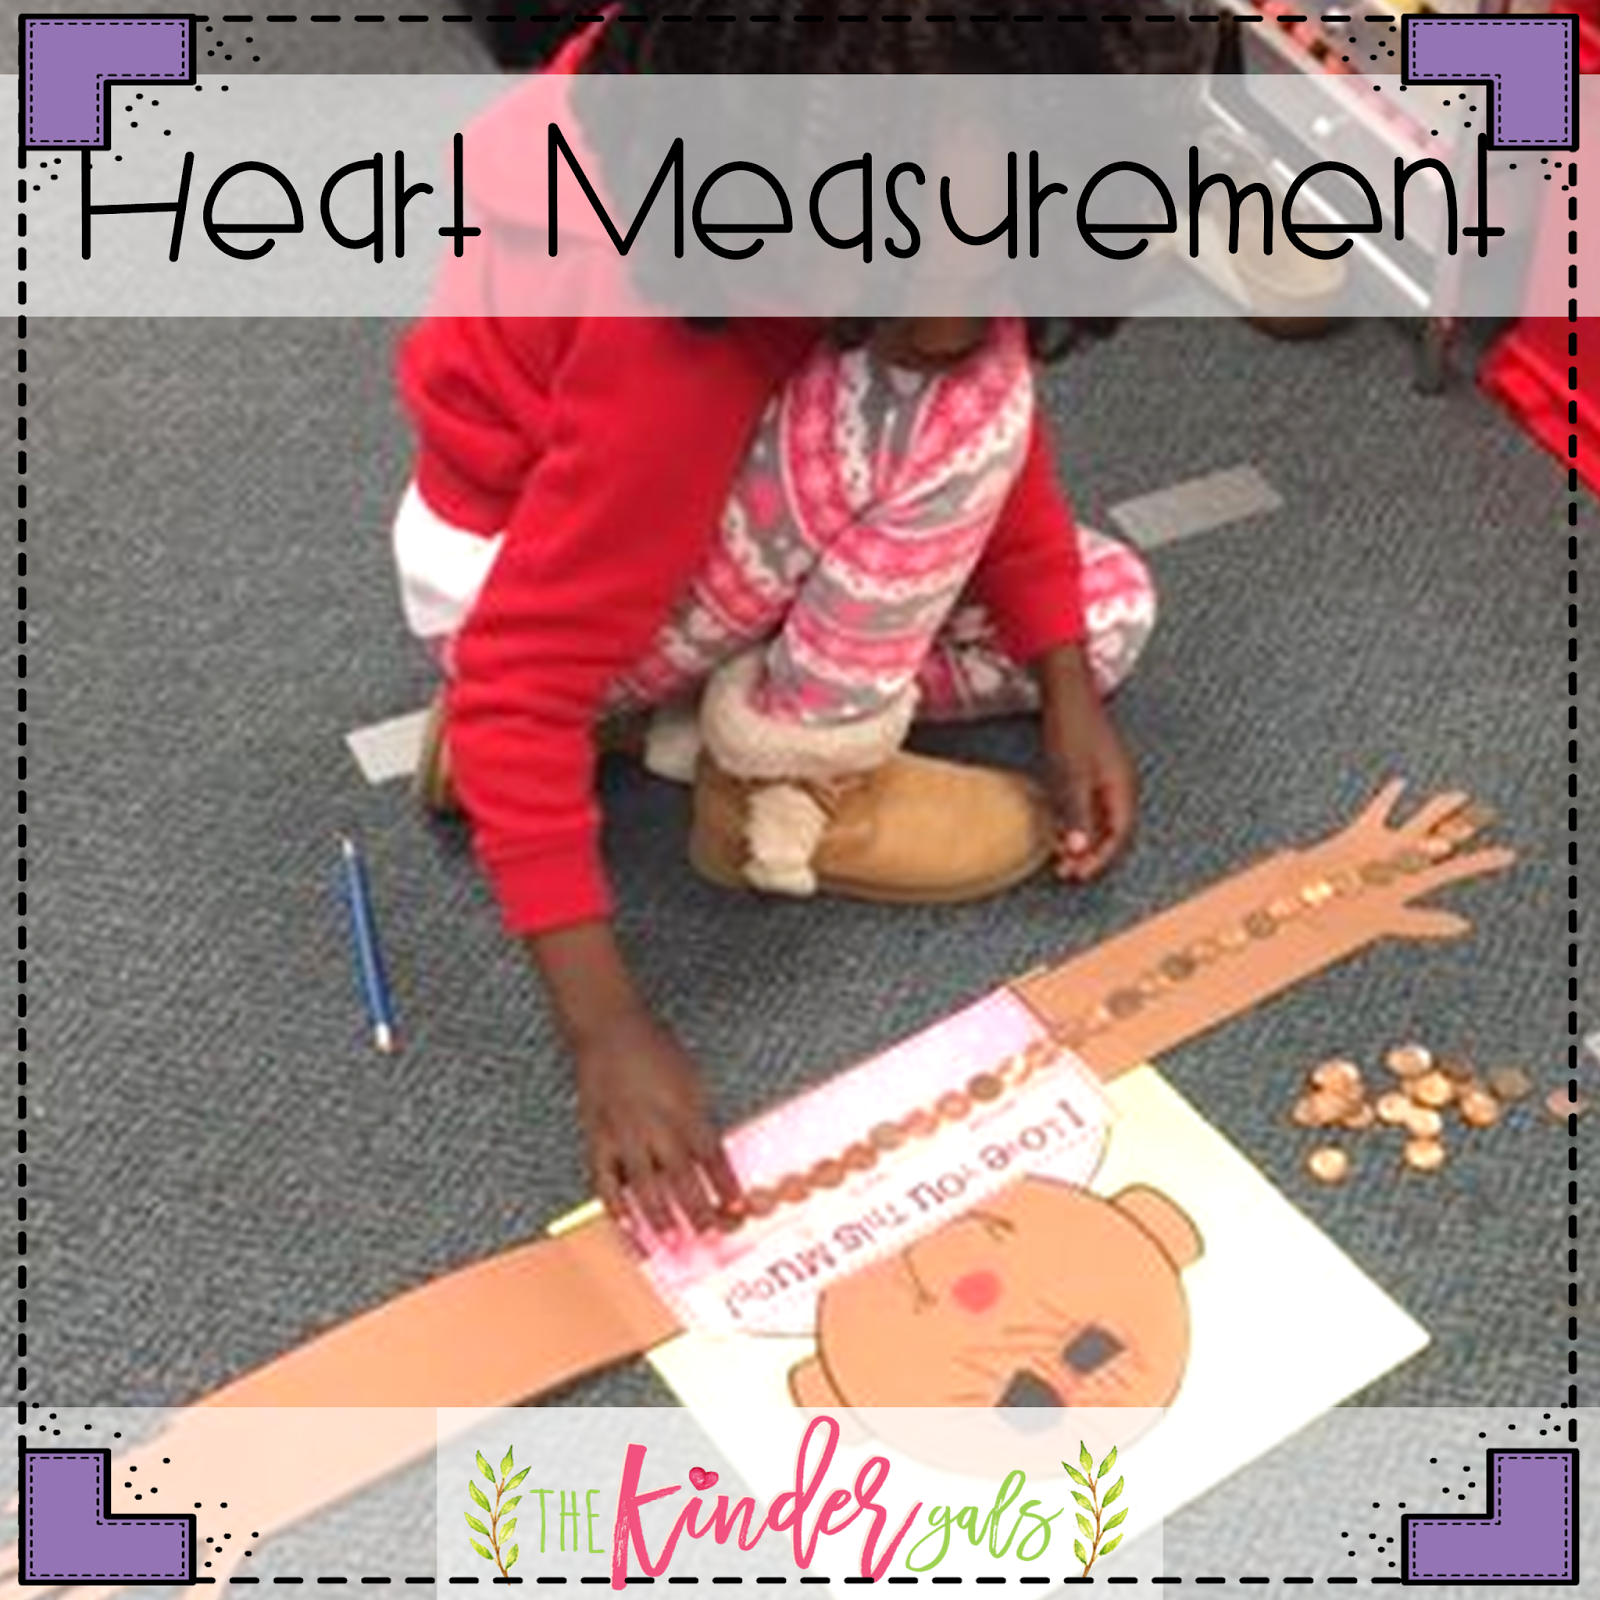
Want to use fewer pieces? Just make the arms shorter or make the measuring items larger. Instead of using pennies, just quarters!
Segmenting CVC Words
This is a fun activity to bridge from phonemic awareness to phonics. First, I gathered a small group of kids at the table. I gave them each one of the cards with the 3 heart animals and 3 hearts.  To play, I show them a picture. The children segment the phonemes and push one of the hearts onto the game board to represent each phoneme. To move the idea to phonics, give the children a little book. Invite them to glue a picture into the book. As they segment the sounds, the write the letters to represent each sound.
Making CVC Words
This is another fun way to build cvc words. Give the children 3 circles, a dice, the game board, and a recording sheet. Invite the children to roll the dice. Take one of the circles and move it up the first column of letters that many spaces.  Repeat for all three columns. Now, write the 3 letters on the recording sheet. Read the word.
Sorting Stamps
To play this game, I found this fun stamp clip art. You could also use real stamps. Give each child around 15 stamps. Invite them to think of different ways they can sort the stamps.  It is better to give them fewer stamps and encourage them to think of many ways to sort.
Comparing Names
To play this activity, give each child a booklet like the one above. Invite the kids to write their name in the first row of boxes.
Now, they ask another child to write their name in the second row of boxes.  Circle whether the name is longer, shorter, or the same length as your name. They loved being able to walk around the room!
Racing Hearts
To play this game, the kids need 3 heart game pieces, a game board, and a dice. Each child needs their own game, it is not a partner game.  The child rolls the dice. Now, they move the hearts that many squares. They can move one heart all of the moves, or they can split the moves between the hearts.
https://www.teacherspayteachers.com/Product/Valentines-Math-and-Literacy-Games-and-Activities-v30-112794
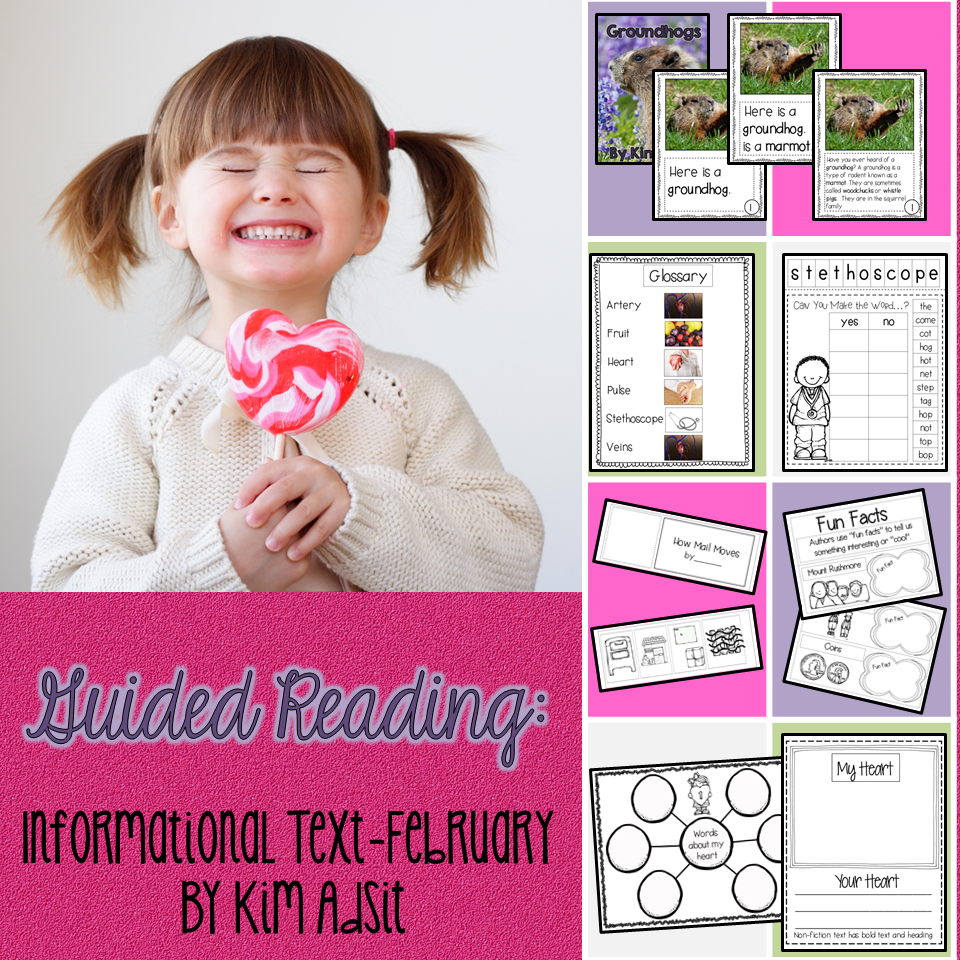
Nonfiction Guided Reading
We love our Nonfiction Guided Readers! The kids are killing it! Notice how we printed in black and white! Photographs are beautiful either way! You can read how to print them as a booklet for easy assembly in this blog post.
Various Levels of Text
To make the book, I created text at 3 different levels.  Each level has the same photographs and uses the same nonfiction features. We use these books for strategy lessons.  This means, we aren't working on decoding, etc. I'm not concerned about a perfect fit. I just don't want it to be too hard! We are teaching our kids how readers use nonfiction features to gain information!
Nonfiction Features
After reading the book, the kids have an opportunity to apply the new nonfiction feature. In this case, the kids are learning how to use a table of contents. They cut the pages to make a little book. Staple. Then, they number the pages and create a table of contents.
Word Work
We also use content from the books to practice some form of word work. Here the kids are taking the letters in valentines to build different word family words. First, they find the letters to make the chunk. Then, they use the remaining letters to see if they make a new word by placing it in front of the chunk.
Writing
We also use writing as a way to practice the nonfiction features. Here the kids are writing text using questions!
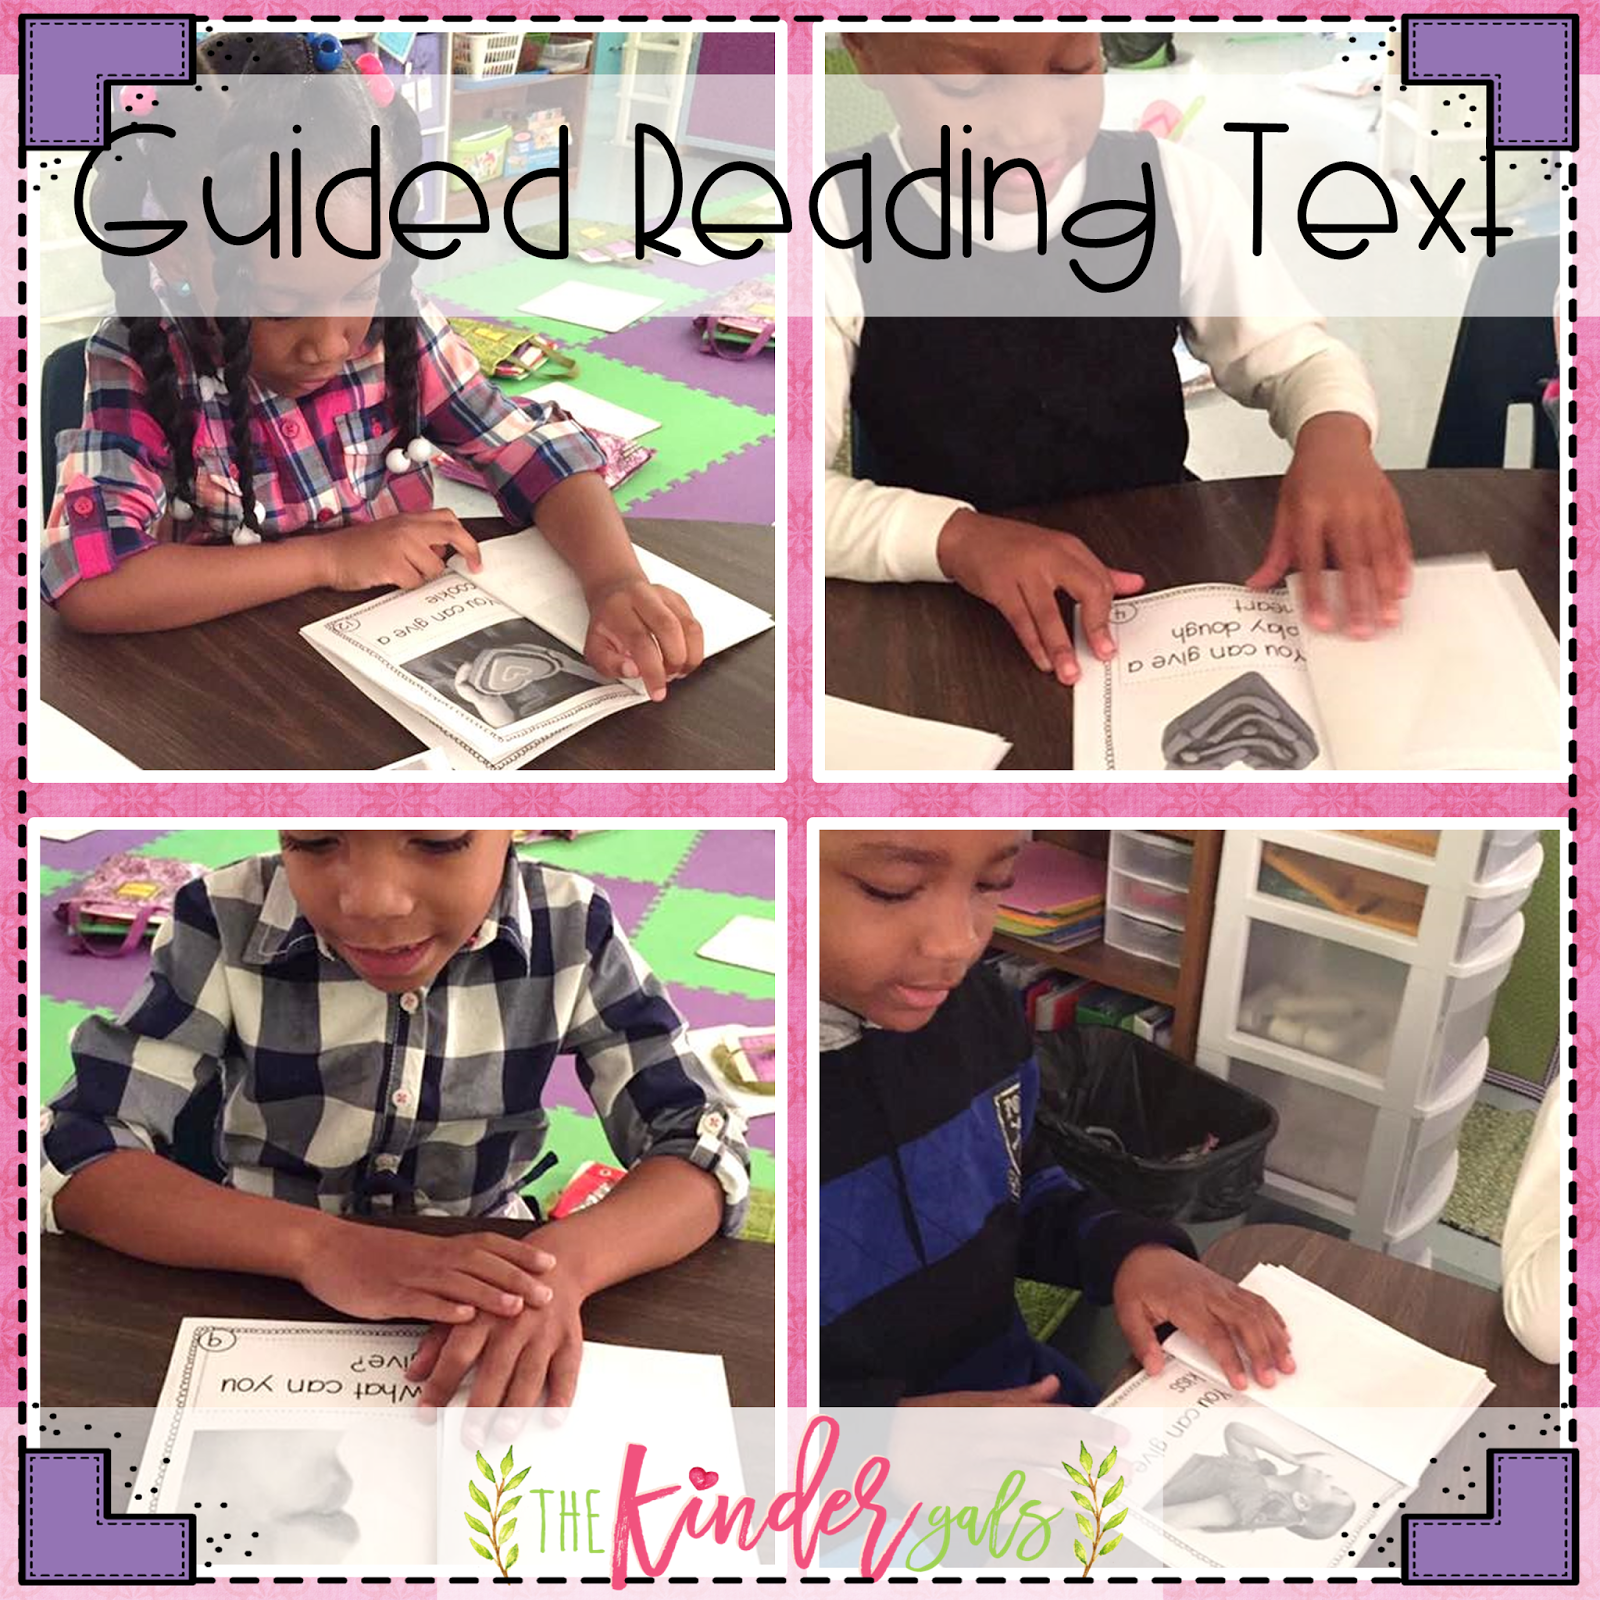
Guided Reading Text
https://www.teacherspayteachers.com/Product/Guided-Reading-Informational-Text-February-by-Kim-Adsit-1670400
Each of our Monthly Guided Reading Units has 5 titles. The February Guided Reading Unit has three books to use around Valentines, a President's Day Book, and a Groundhogs Book.
Who Has More
This is a fun game to use during math centers.  To play, make a deck of cards and a game board. The game board needs a more and less spinner, and a square for more and a square for less. To play, each child turns over a card. They compare for more and less and place the card on the game board.  The child with "less" spins the spinner. If it lands on more, the child with more gets both cards. If it lands on less, the child with less gets both cards.
Measure Me
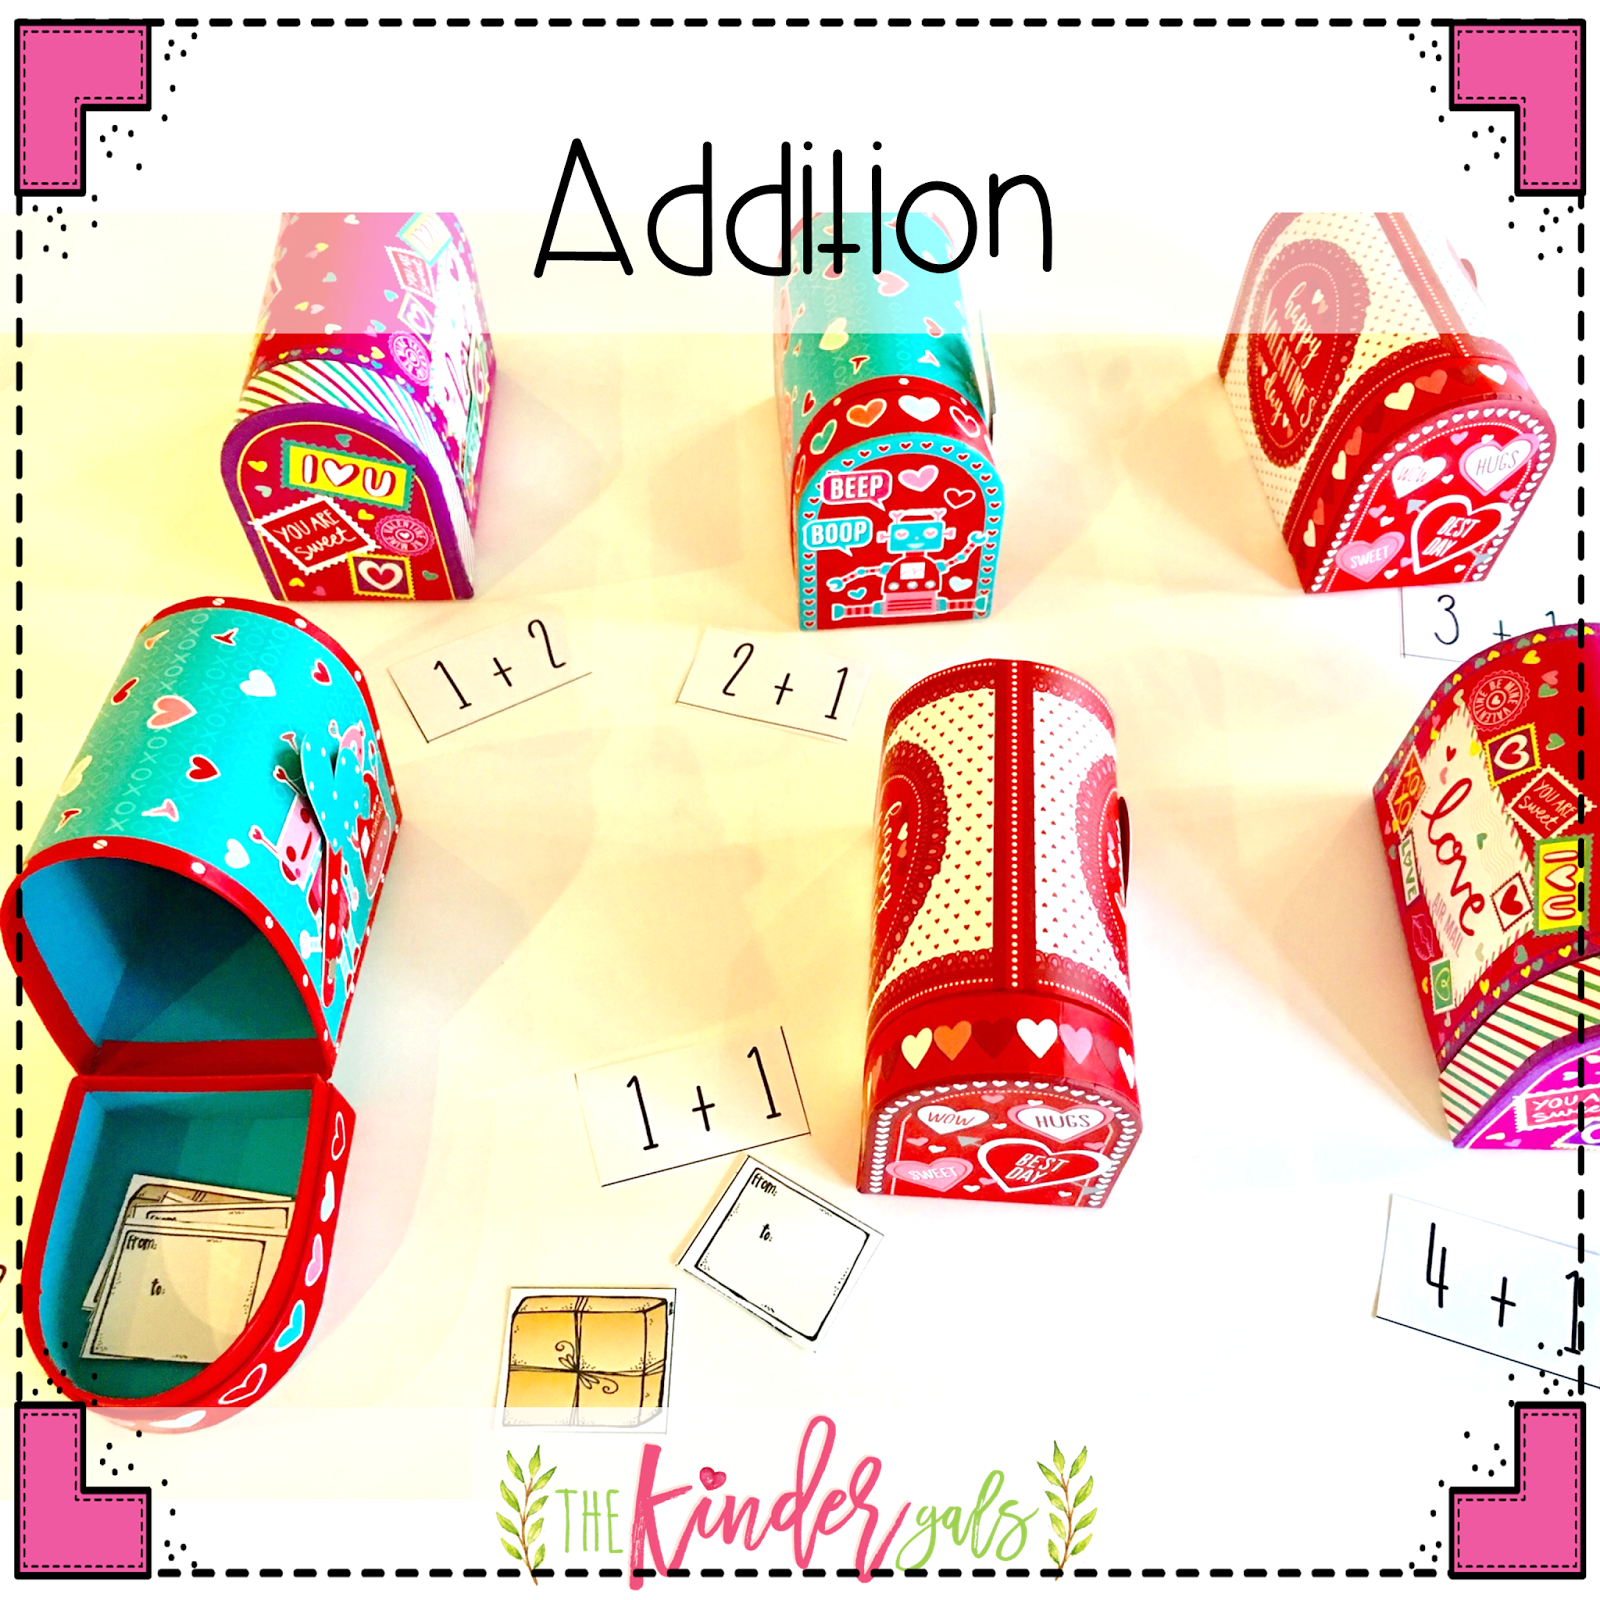
The kids love playing this game. One child lays down. The other child uses the mail trucks to measure the length of his body.  On the recording page, they record how many it took. Then, they trade places!
Roll Count Compare
The kids love this game! To play you need a game board, unifix cubes, a dice, and a board with a more and less spinner, and boxes for more and less.  The first child rolls the dice and counts out that many unifix cubes (all one color). Then he places the cubes on any squares on the game board.  The second child rolls the dice and counts out that many unifix cubes (a different color than his partner). Put them on the game board. The children continue taking turns until the game board is full. Now they can each collect their own cubes and compare for more and less. Spin to see who wins!
https://www.teacherspayteachers.com/Product/Valentines-Day-Math-Game-Pack-111402
These ideas are from the Valentine's Math Game Pack
 
You can grab this fun Roll, Say Keep game as a freebee below! To play, make a game board with 6 squares. Put a dice face in each square.  Make a set of cards. I made 3 sets--numerals, letters, and sight words.  Select a set of cards and place them on the left side of the game board.  Put 6 of the cards on the game board.  Invite the children to roll the dice.  Look at the game board and find the dice face that matches the dice.  The child "reads" the card in the square. If they can read the card, they remove it from the game board and place it on the right side of the board.  Add another card into the blank space. Continue until all of the cards are moved to the right side of the game board. 
 
Pin It!

Wednesday, January 17, 2018

FREE Balanced Literacy Scope and Sequence Part 1 Reader's Workshop

Ever wonder how people can keep a mini lesson to last only 10 minutes? Do you struggle with keeping the standard clear and evident? Do you hate writing plans? If you answered yes to any of these questions then this blog post it just what you need! 
I finally did it! While I love the creative side of teaching, paper work has never been a friend of mine.  I loathe doing lesson plans, scripting lessons, and keeping records. I put it off. BUT, these activities are essential for effective teaching.  So, what did I finally do? I finally took our bundled units for readers workshop, writers workshop and literacy centers and created a monthly scope and sequence to show how the three series work together to grow literate children.  In this blog post, I am going to explain the reader's workshop scope and sequence. Read all the way to the bottom. The scope and sequence is a FREE download!
Brainstorming the Unit
 Each month, when Michele and I were writing these units, we would meet for dinner at Panera! After dinner, we would spend hours sitting in the booth unpacking the standards and deciding what the children would be able to do if they had indeed mastered the standards.  We then decided on our daily focus for each of the 20 days and what the resources would look like that we would be using. Then, we went home! We each had our assignments--Michele would script the lessons we had agreed upon and I would make all of the anchor charts, teaching pieces and plan our monthly celebration.  It works! Michele gets to do what she is a genius at--scripting, and I get to do what I enjoy--creating resources.
This picture shows our spreadsheet for the 5th month. Each of our units include this type of spreadsheet. This enables us to quickly see which resources are needed and to identify the big idea for each lesson.
Scripting the Lesson
 
For each of the 20 days, Michele wrote DETAILED lessons where she scripted our thinking and what we are going to say in order to get the responses we are seeking. Don't worry that you can't read it, I'm going to show you a close up of each component of the lesson.
Lesson Components: Part 1: Connect
The mini lesson occurs with the kids gathered around you in your meeting area.  They observe and listen as you connect and TEACH the new learning.
In the connect part of the lesson, the objective it to remind the kids what we did yesterday.  This gets everyone ready and in the same place.
Part 2: Teach
The new learning is introduced during the "teach" portion of the mini lesson.  In this lesson, we are teaching the children how to "switch up" their thinking when they are reading by looking at the picture and then identifying the beginning sound.
Using these cards, I show the children the picture with the letter "t", I identify the picture as a toad. But, when I open the card, I see the "fr" and so I "switch up" my thinking to see that it is a frog. After modeling with a few cards, sharing my thinking each time, it is their turn.
Active Engagement
Active Engagement is when the children practice the new learning.  We listen in as the children answer and demonstrate their understanding. 
The children sit beside their elbow partner as we show the remaining cards. They are responding to their partners as they "switch it up".  In this particular mini lesson, the children do not need any materials to practice their new learning. But sometimes, the children do need resources.

For example, in this lesson, during the Active Engagement portion of the lesson, the children are retelling Little Red Riding Hood. Each partnership needed a set of the retelling pieces to demonstrate their mastery. 
Link 
During the Link portion of the lesson, we are reminding the children what they just learned. 
This is a great time to model using the academic vocabulary and to equip children to use this vocabulary during their discussions with other children and with us.
During the Link portion of the lesson, we are also building our anchor chart. I premade the chart. Then, we cover it up with a piece of bulletin board paper. Each day, we reveal the next part of the anchor chart to show the new learning.
Scope and Sequence
See what we did there? Michele and I did all the prep work. We unpacked the standards, brainstormed the big ideas, scripted the lessons, and made the resources.  Here's what's cool about that...now you can shift your focus to the delivery.  That is the most important part!
Here's what we just finished. I made a spreadsheet for each month. This enables you to see what you are doing during reader's workshop, writer's workshop and at literacy centers. You can grab the 9 month spreadsheet at the bottom of the blog post.
Both the Reader's Workshop units and the Literacy Center units have scripted lesson plans for the mini lesson! That makes it super easy. Be sure and grab these discounted bundles (it might just make your life a little easier).
https://www.teacherspayteachers.com/Product/Readers-Workshop-MEGA-BUNDLE-by-Kim-Adsit-and-Michele-Scannell-1013520
https://www.teacherspayteachers.com/Product/Kindergarten-Centers-YEAR-LONG-BUNDLE-2006443
For the Writer's Workshop, I did NOT script the lessons. These units have the monthly spreadsheet of the resources and the big idea, but no scripted lessons.
https://www.teacherspayteachers.com/Product/Writers-Workshop-Building-Writers-Bundle-2-by-Kim-Adsit-2403005


Pin It!

Thursday, January 11, 2018

Building Number Sense with February Math Mats

A few months ago I shared some fall themed math mats for developing number sense! This post shares some of our favorite February themed mats (groundhog's day, valentines, and postal workers) for developing number sense!
Getting Started
  • To make ONE math mat game, place 6-8 boards and about 100 counting pieces into a ziploc baggie.
  • I use math mats as one of my centers. I can have 4-6 kids in that area. 
  • Since each child will select one of the baggies, I want to have at least 7-8 math mat baggies in order for each child to have choice. 
  • Each child also has a library pocket that contains cards. The cards determine what each child will do with their mats and counting pieces.
One to One Correspondence
If a child has cards with dots in their library pocket, he is learning to touch each object and to assign a number word to that object.  He may, or may not, recognize any numerals at this point. In this example, the child counts the dots on the card. Then, he puts that many suns or clouds on the groundhog. Repeat this on each of the game boards. These children are also developing cardinality, conservation, and subitizing.
Numeral Recognition
If a child has cards with numerals, they are counting the correct number of pieces onto the game boards  to match each numeral. When we say "number" we are referring to that set of objects. When we say "numeral" we are referring to a symbol that represents that number!  The child places one numeral card on each game board and counts a set of objects to match the numeral. In this example, the child is counting hearts and keys clip art pictures onto the game boards.
In order to save ink I have a few choices. I made each game board and page of counting pieces in both color and black and white.  In this game, I printed the hears on pink and red paper to save color ink!
I found these cute counting pieces at the Dollar Tree. I bought 2 packages of each color to be sure and have enough. I can use these instead of the paper counting pieces.
Number Combinations
I also found these fun Valentine cups at the Dollar Tree. I picked up some straws to use for the counting pieces. If a child is working on number combinations, all of the cards in their pocket will have the same numeral. For example, if the child is working on combinations for 6, then you will put enough "6" cards for them to use on all of the math mats. 
***Important thing to think about:
Once the children get to this step, you will want them to have the opportunity to divide their counting pieces into two groups. In this example, there are two different colors of straws. They can put 1 pink and 5 purple to make 6. But, if I only had pink straws, they could put 1 straw on the ground and 5 straws in the cup. This means that you want ALL of your games to have the ability to do this! That way, regardless as to where the children are working, they can all use the same math mats.
Addition
I hit the jackpot at the Dollar Tree. I also found these fun little mailboxes. I had to think about this one as each mailbox was $1. In the end, as you can see, I got them. I just know the kids will love them! Sticking with the same games, we can also teach addition.  Here the kids are putting packages and letters into the mailboxes to match the equations.  Before beginning this step, you will want to call kids into a small group that are ready for addition. Give each child one game board. As you tell story problems, invite the children to manipulate the pieces to solve the equation. Once they understand this concept (it could take 4-5 small group times), introduce the equations. Tell a story problem that matches the equation.  After you have modeled several times, invite the children to tell story problems. Once this is mastered, give each child their own math mats with a variety of equations. Invite them to spread out the mats and solve each equation. Once they have finished, the children select one of the cards to tell you an addition story.
Subtraction
When I saw these roses at the Dollar Tree, I looked for some plastic vases. All I could find were glass ones. Then, I saw these glasses. I guess from the picture you put dessert in them? To use the game boards for subtraction, use the same steps as addition just this time use subtraction!

 Here's what's cool.
  • When the children go to the Math Mats center, they select their pocket folder out of a file box.
  • Next to the file box is a container with the games in baggies.
  • Each baggie contains ONE game (6-8 mats and about 100 counting pieces).
  • They can pick ANY baggie!
  • All of the games can be used regardless of where the children are working in their number development. 
  • In order to determine where the kids need to begin, you can go back to your formative assessment. I love to use the ESGI platform!
ESGI is a great way to keep up with your assessments! The assessments are right on your computer or ipad. I just walk around the room and ask the kids while they are working! It then gives you a score for that assessment. 

I love that ESGI allows you to print out a parent letter with the information for everything you have tested!
It will also print out flash cards so that parents can help at home. You can check out ESGI for free! Just go to this link and sign up for your free trial!
Here are the units the contain the game boards, pages of counting pieces, and the cards for the pocket folders. The game boards and the counting pieces are in color and black and white.

Math Attack Bundle 1 contains math mats that I use from August through January.
https://www.teacherspayteachers.com/Product/Number-Math-Attack-Learning-the-Facts-Bundle-1-2636783
And Math Attack Bundle 2 contains the math mats I use from February to July.
https://www.teacherspayteachers.com/Product/Number-Math-Attack-Learning-the-Facts-Bundle-2-2636814


Pin It!
 
Pin It button on image hover

Receive All Free Updates Via Facebook.