KinderGals

Search This Blog

Thursday, January 31, 2013

Good things are happening in West Virginia!

Slide6
Last week I was working at a school in West Virginia where I have done some previous staff development. So, as I was doing some observations, it was great to see some of the ideas I had shared being implemented. The photo that shows the munchkin with the clip board--is doing the survey center. Here they write their own questions and then they walk around the room and survey their classmates. The middle picture shows the clip behavior system. The clip system isn’t my idea! As a matter of fact, Megan is the one who taught me about it. But I had shared that system with them and was pleased to see it in use. If you want to read more about it, see this post. http://kindergals.blogspot.com/2012/04/watch-out-spring-fever-has-hit-kiddos.html
The stacking drawers are for center storage. I have my class divided into 5 center zones. There is one of these drawers in each zone. So, the kids rotate through the zones, visiting one zone each day. When they finish their “have to” work, they are able to select things from the drawers until center time is over. Here is an earlier post about managing literacy centers.
http://kindergals.blogspot.com/2012/07/literacy-center-management.html
Let me say this….these teachers might have already been doing these activities in their room before I came. I know we can have similar ideas. I just know that I have worked with them in the past and they MIGHT have implemented this idea AFTER the staff development.
Slide7
We did work on center management and here are two ways that I saw evidence they were “managing those centers”! The photo on the left…The teacher has the colored rectangles attached with Velcro. Each day she moves the color down to know which group will do which activity. The photo on the right…The teacher has five areas set up in her room. Each area has one of these shelves and a stacking tray. Each area has a different color theme.Slide8
Here were a few great anchor charts I saw. The one of the left was from a second grade class and the one on the right was from a kindergarten class.Slide9
The two kindergarten classes that I visited were learning about shapes. The photo on the bottom (above) shows a chart that the teacher made with them during a mini lesson about shapes we might see on a trip to the beach. Then, the photo on the top shows how the children worked during centers to each contribute to the mural using ideas from the anchor chart. One thing that I loved, is that this teacher had saved last years mural to show as a model. What a great idea for our visual learners!
Slide10
Shape Centers….BTW, I do have a pack on tpt for the common core shape standards. You can see it (here).
Slide11
I think this was my favorite thing I saw all day. After, worktime (centers) the teacher had the children walk around the room to see what their friends did during math. When the teacher and I were talking, I told her how much I loved it. Then, I had one of those “YOU KNOW WHAT?” moments. You know how common core encourages, well really requires, us to allow time for peer to peer interaction, sharing, and discussion? So I thought, what if when they are finished with their gallery walk, they went back to the carpet and shared with their elbow partner something they would like to try tomorrow, something that was interesting, something that they had never thought to do, etc.  This is why we collaborate! By the two of us talking about the sharing time, we were able to expand on an already great idea! Loved it!Slide12
This picture is evidence of more common core work. We need to help the children see how math is all around them—mathematize their world! Other examples might be: We only have 5 swings. How can we make it so that it is fair?  or Do we have enough ___ so that everyone gets one? How can we figure that out? or How many people should get in each line for the water fountain so that we all get done about the same time? Slide13
Finally, here are some twists on some old ideas! We’ve all played boggle before. But, I love this idea. They have the letters attached with Velcro so that each week they can change the letters. Then, the kids use the recording sheet to make as many words as they can. LOVE IT! The teacher actually gave me a copy that had the address for where she got the recording sheet. But unfortunately, only half of the address is on the form. Leave a comment below if you know where you can find the recording sheet, please. Smile
The other picture is an overhead center. Now for you young folks, you might not know what this is..but I can promise you that unless you are in a brand new school, there are some of these in closets somewhere. They make great centers. In a second grade class where I was visiting, the teacher had great open ended centers where the children were able to create their own learning. So, some of her kids where playing this game. One would write the spelling words with mistakes, then the other kiddo would be the “editor” and correct the mistakes. How fun is that?
I am excited to be going back to this school in a few weeks to do some modeling and some work on Reader’s Workshop. Can’t wait to get in there!
Pin It!

Sunday, January 27, 2013

What’s Megan Been Up To? And What About Kim?

Slide1

Do you know how much I miss this? I loved being able to pop into Megan’s room anytime I wanted to get my “kid” fix. She often sends me pictures of things her kiddo are doing and here are a few from this week. These hats are nothing new, as I found out this week. You know how you have an idea, you really think you were the only one to think of it, only to find out that several other teachers do the same thing? Well that was true of these. HOWEVER, we did change how we do them! Here is how we did the silly hats—common core style! The kids had to spin a spinner 0-10 (included in the Day 100 pack). They put that many dots of one color on one of their strips. Then, they had to determine how many more to make a ten and put that many of another color dot. They did this for all 10 strips. We also had a recording sheet where they put their number combinations to make a ten! Slide2
Here is another idea that Megan used this week. I teamed up with my super sweet, creative teaching partner and friend, Wendy Gilstrap, to do the Day 100 Pack. This was one of her ideas in the pack. Just loved it! They made a Zero, the Hero glyph. These photos show Megan’s class doing their analysis of the data! Click on the photos to find the pack on tpt.

So that’s what Megan was doing this week, what about me? Well I was in West Virginia working in two different districts. On Wednesday, I did classroom observations to get ready for Thursday when I was going to do some model lessons and some presenting on Reader’s Workshop. Noticed I said “Was Going To…” Well, that’s because it snowed Wednesday night and school was cancelled for Thursday. Really? There was an inch of snow and school was cancelled? I thought we only did that in the south. Come to find out, the ice on the narrow, rural roads makes it unsafe for the buses…good reason to cancel school.

Slide3

So my good friend Kathy picked me up at the hotel and we headed to the outlet mall. I have gone absolutely baby crazy! We hit all the baby stores, but these were my favorite find. Are you kidding me? Baby swim trunks? Well, since his Gammy has a pool, we had to get a few pairs. And what about those sunglasses? Have you ever? (Can you tell I’m just a little excited?) I did finish the week on Friday in West Virginia presenting about Writing Common Core. We were also going to work on the reading foundational skills. We were only getting started when we found out that they were on early dismissal for ANOTHER snow event. So, we packed up a few hours early and I headed back to DC. The hour and a half drive took me three hours! Roads were closed and I don’t know my way around to know any alternate routes, but thanks to Kathy’s husband he helped me navigate--through the phone!

While in the hotel on the snow day, I also had time to finish up on the Valentine Party Pack that Wendy and I put together.

Slide4

Here is one of the activities from the pack.

Slide5

This game is played like cootie. It always amazes me the number of people who have never played cootie. It is a “sure-enough” game that you buy in toy stores. I like to take that format and turn it into all kinds of games. To make the love bug they roll the dice to determine which part of the bug they get to add. The patterns for the parts are included in the party pack so that all you have to do is put it on the copier and copy! No tracing and cutting for you! The kiddos can cut their own or you can cut if out for them to speed it up! Click on the photos to find the pack on tpt.

Later this week I am going to share some of the great ideas I saw while doing my observations. See you then….

Pin It!

Saturday, January 19, 2013

Math Workshop--A Framework for Teaching Math

Establishing a Framework for Math Instruction ensures that quality instruction is provided everyday. This blog post shares how we organize our math block using mini lessons, centers, and small groups.
Let's take a look at Math Centers.
The first part of Math Workshop is the Mini Lesson. The Mini Lesson is where the new learning occurs. It follows the scope and sequence for the year.  The Mini Lesson has 4 components:
  • Connect to Prior Knowledge: "Remember when..."
  • Teach the New Skill: "Today I am going to show you..."
  • Active Engagement: "Now it's your turn."
  • Link: "Remember boys and girls, today and everyday, good mathematicians..."

After the Mini Lesson, the children move to centers. I divide my room into 5 center areas. This way, I can make sure that we are revisiting all of the standards throughout the year. These areas are NEVER new learning. They are review activities of things that we have already learned.
  • Data and Sorting
  • Geometry
  • Measurement
  • Counting and Cardinality
  • Number and Operations
  • Operations and Algebraic Thinking
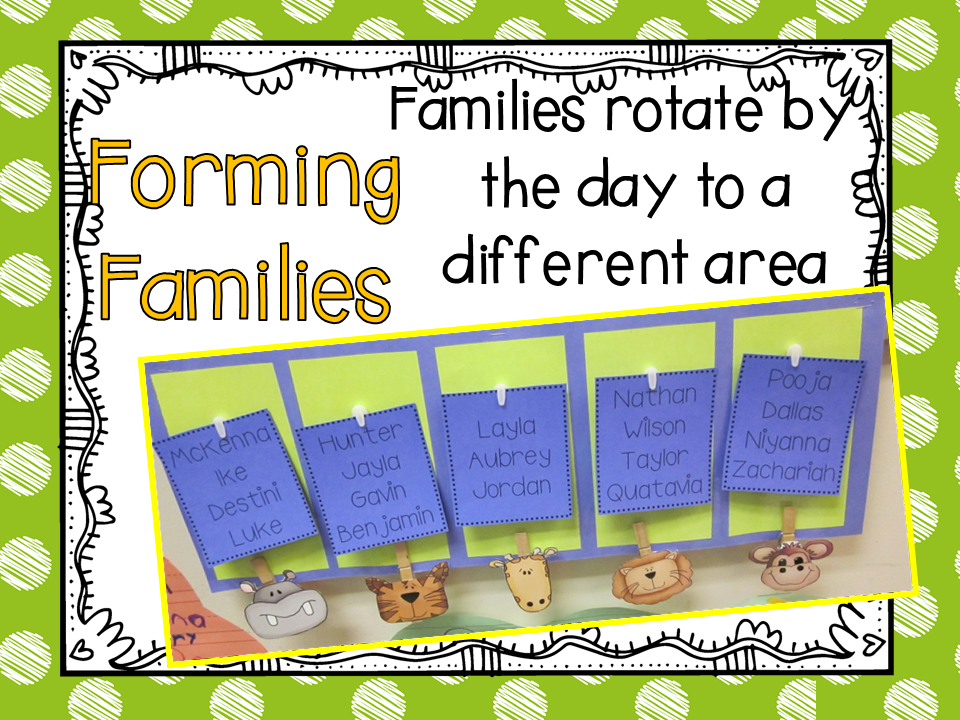
We divide our kids into "family" groups. These are the kids they go to centers with.  Each day a family group visits one of the center areas. Each center area is labeled with one of the jungle animals.
When they get to their center area, the first thing the do is the "have to" activity.  These activities are review of previously taught standards. They are things that the kids know how to do independently. These centers are product driven. The kids will have something to turn in to let us know they did the center.  The yellow tubs are for literacy centers and the green tubs are for math centers.
When they finish the "have-to" center, the children move to the "can-do" centers.  Each of the 5 areas has their own storage unit.
Can do centers are manipulatives, games, books, or songs. These don't usually have a product. They are things the kids have done before. Just look in your closet...anything math...puzzles, counting games, etc... can be can do centers. Here are some examples of some "can do" centers.
https://www.teacherspayteachers.com/Product/Linking-Cubes-Math-Activities-Unit-2-by-Kim-Adsit-and-Michele-Scannell-v20-2830670
To play Roll and Build, each child needs a game board, a dice, and linking cubes.  First, they roll the dice and count that many cubes. Then, they put the cubes on the board. They can put them in any square, putting all the cubes in one tower on one number, or put a few on each number. The object is to make a tower in each square to match the number. This game is from our Linking Cubes Unit.
https://www.teacherspayteachers.com/Product/Dominoes-Domino-Games-Fun-Games-to-Teach-Number-122807
To play this domino game, each child needs a game board. The children take one domino at a time and count the dots. They put it on the house with the numeral that represents the sum. They continue until all of the dominoes are on the houses. They can use a recording sheet and write the combinations for each number. This is from my Domino Unit.
https://www.teacherspayteachers.com/Product/Card-Games-to-Teach-Number-100924
The children need a partner to play this card game. Put a stack of cards between the 2 children. Each child turns over a card. They compare for more and less and lay it on the game board accordingly.  The child who had the card with less, spins the spinner. If it lands on less, the child with less gets both cards. If it lands on more, the child with more gets both cards. This is from my Cards Unit.
While the children are working in centers, I meet with small groups, usually 2 groups a day.  I use ESGI, a formative assessment tool, to help me group my kids according to where they are on the standard I am teaching. Then, while the kids are working in centers, I walk around the room and collect the children I need.  After they finish my table, they go back to their center area and keep working.
Haven't heard of ESGI? You can try it for free for 2 months. Go to their website ESGI and use the code "adsit" to get two months free. This will also give you $40 off if you decide to purchase.


Pin It!

Thursday, January 10, 2013

Hooray for MLK Day!

In January we remember Dr. Martin Luther King! This post contains fun, engaging activities that are sure to build knowledge about this important man in history.
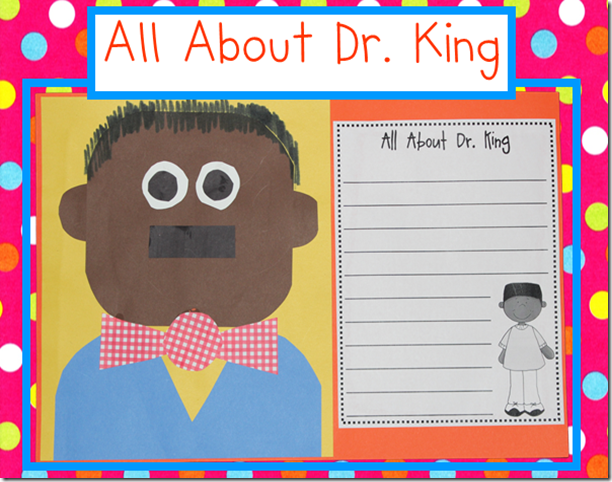
Slide18Can you believe that MLK day is just around the corner? Time is flying by! Here are some of the things we are doing in Megan’s room to celebrate this Famous American. Here is our craftivity where we are recording all that we learn about MLK.Slide13
This photo was from last year! I can’t believe how great they did with this activity.
Slide12
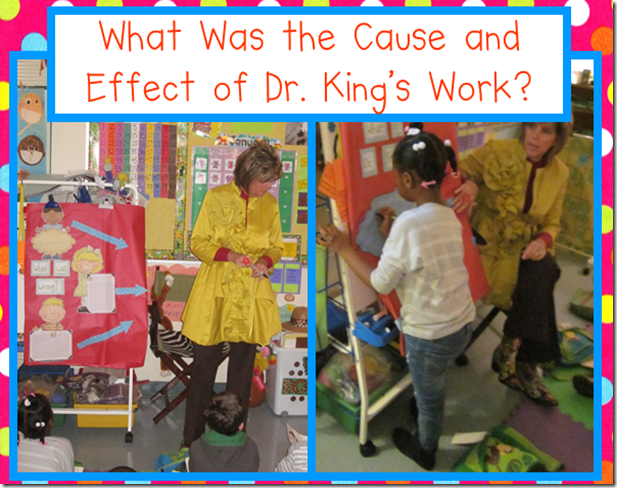
First I asked them, “What was wrong?” We talked about the things that Dr. King saw that he wanted to change. Then, I asked “What did Dr. King do?” and we talked about all the things Dr. King did to make things better. Finally, I asked them, “Then, what happened?” and we talked about the results of his work today. They did amazing when we walked through each step.Slide7
Another thing we did was to use clip art to help solve this story problem. So, why clip art? Well, in Singapore Math we know that children learn “CPA”—that’s conceptual, pictorial, abstract. That means we must have children learn the concept using materials that can be manipulated and moved so that they can make meaning. So is this conceptual or pictorial? I say conceptual. To me, since conceptual means that the children can manipulate the items to help solve the problem, they can move the clip art pictures around to make that meaning. Pictorial would be if I had asked them to draw a picture to show their understanding. Don’t you just love the writing? It says, “Him and Him can share a ball. Him and him can share a ball.  Him and him can share a ball.”
Slide2
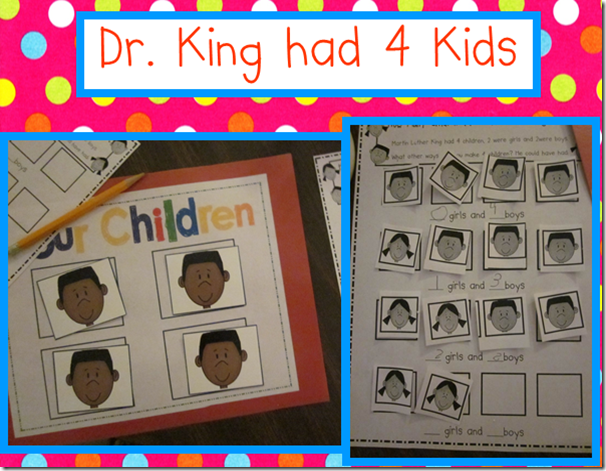
Here is an activity to work on number combinations. Dr. King actually had 4 kids-2 girls and 2 boys. I gave them clip art and they came up with ways to make 4 kids. Then, they glued down the black and white clip art and recorded their number combinations.
These are a few of the activities in my Hooray for MLK Day. You can see it by clicking (here) or on any of the pictures.
Pin It!

Monday, December 31, 2012

Happy New Year

It's almost that time! Most of us will head back to work on Monday. I love having a "Happy New Year's" party my first day back. Here are some pictures from last year. Instead of starting right into a new topic, we spend that first day back learning all about the customs of New Year's Day.
Hockey or Football Survey Graph
Slide2
For one of our math centers the children did a survey graph. They asked their friends if they would rather watch football or hockey on New Years Day. After asking their friends, they create a graph to show the results. Lastly, they write their analysis.
Ordinal Number Trinket Cakes
Slide3
The children create ordinal number trinket cakes. I folded a piece of long construction paper in half. Cut slits in the top half. Invite the children to glue down the color cupcakes onto each flap. Under each flap glue a trinket that is hiding inside of the cake. The children complete the recording page by lifting the flaps and recording which trinket is in each cupcake. The cool thing...everyone's will be different depending on the order they placed their trinkets.
Slide4
All About the Number 12
Slide5
In the morning when the kids come in, we pretend it is New Year's Eve. We count down until 12 noon. That is our New Year's Eve Celebration. This is a great way to connect the number 12! We talked all about 12, tally marks, dominoes, ordinals, etc.
What Do You Eat on New Year's Day?
Slide7
Maybe it's a southern thing, but on New Year's Day we eat black eyed peas, cornbread and turnips. The truth is, I must not be southern, because I don't really like any of those foods. But, my kids would never know it! We make cornbread at school using the Jiffy mix cornbread. We either have canned (if I'm in charge) blackeyed peas, or fresh ones (if a parent is in charge)!
Slide9
The kids really amaze me. Some don't want to taste either...I never force it! But, most love it! After eating the cornbread and black eyed peas, the children make a face. In the mouth, they draw peas, cornbread, both or neither. We used the faces to create a double bubble map.
Slide10
The kids made theirs as we went along.
Countdown to New Year's Day
Slide11
On a strip of black paper, the children sequence the numerals 10-0. I glue the strip onto a horn like in the photo above. When we count down to New Year's, the kids blow their horns.
New Year's Day Party Hats
Slide12
But, we don't just blow our horns. The kids each make a face like the one above. When it's time to count down, they put the face in front of their face and place the horn in their mouth. Now they are ready for a party!

New Year's Day Circle Map
Slide17
It isn't a celebration without a little bit of glitter. The kids each make their own mirror ball by covering a circle with silver glitter. On the circle map, we write all the words that define New Year's. Then, we glue the circle map onto the mirror ball.
Our Year In Review Tree Map
Slide14
We made a tree map by thinking back to each month we have been in school. We thought about something we did each month to record on the tree map. 
Firecracker Cut a Sentence Book
Slide16
In one of the literacy centers, the kids did a firecracker cut a sentence book.
 
These activities are from my Hooray for New Year’s Day Unit.
Slide1

Here’s to a great year!
Pin It!

Sunday, December 30, 2012

So where have I been…..

Slide1
Oh my goodness…It has been nearly 3 weeks since I did a blog post. This has been a crazy few weeks. Right before Christmas, Andy took me to NYC for the weekend! We are only a 3 hour drive away, so this GA girl wanted to see Christmas—New York style. And let me say, they didn’t disappoint!  We went to see Wicked and Mary Poppins (Wicked has to be the best play I have ever seen!), walked through many parks all decked out for the holidays, ate way too much food and did a little shopping (well maybe more than a little!)
Slide2
Then, we headed to GA to spend the holidays “at home”! It was great to spend some time with the kids and my mom and sisters as well as catch up with a few friends. The time just went by too quickly and I kept thinking it was almost over! On Christmas morning Andy made our traditional breakfast—pancakes! I’m glad I married someone who could cook. If they waited on me to cook something…we would starve!
For those of you who don’t know, (Is there really anyone I haven’t told?), Andy and I are going to be first time grandparents. So after the holidays, we went to “First Glimpse” with Megan and Nick to see if they were going to have a baby boy or a baby girl. When it was time to reveal the gender of the baby, we all hid our eyes so we couldn’t see. We had the results sealed in an envelope and gave the envelope to Megan’s best friend, Jaime. That was on Thursday. So for 2 long days we waited, And then yesterday, we hosted a Gender Reveal Party at the house and invited Megan’s friends, family and a few of our close friends to share in the good news with us. We had everyone wear pink or blue as to which they thought we were going to have. I thought boy, but voted girl (I need to buy some hair bows.). We had people graph their guess on the clothesline and took their photos with “bows” or '”mustaches”. We ate pink and blue treats! Megan and her friend, Jaime, decorated the box. Friday night Jaime took it home and filled it with balloons to match the sex of the baby! She was the only one who knew. So, at the party, Megan and Nick opened the box. And, they are having a…..
Slide3
BOY! We are all beyond excited!
Slide4
Slide5TToday, I got back to work and met up with my partner in crime, Michele, to work on Unit 7 for Reader’s Workshop. We went to Panera Bread, had lunch and then took up their table space until 5:00! I love to work with her. After catching up on girl talk, we spent the afternoon talking about reading and how we think children learn to read, how to sequence the next unit, what the mini lessons should be, and what “pieces” do we need to make for the new unit! The new unit, yet to be named, will focus on ways to figure out words and  author’s craft! We will now set to work, with us each doing our part. We then put it all together and check to see that everything flows like we want it. It is a long process, but I think it really makes for a great unit!
Pin It!
 
Pin It button on image hover

Receive All Free Updates Via Facebook.