Organization! Does it come easy for you or are you constantly trying to organize? Organization is important because it CAN increase instructional time! This blog post shares my Top 10 Organization Tips that will be sure to save you time!
Organization Tip Number 1: Organize student materials for easy access. Carpet Bags have changed my life! Since our kids do not have assigned table seating, the carpet bags are an organizational system that allows the children to keep up with all of their supplies. In the morning the children remove their bags from the baskets and place them on their carpet squares. The carpet bags hold all of the supplies that we are use during any large group instruction.
Here are some of the items we store in the bags. Carpet bags can save you tons of time! For example, if we are going to use a tens frame during math, we invite the children to look in their carpet bags and get out their spiral bound working mats and their collection of counters! Wala! Just like that, they are ready to begin instruction.
You can read about all the individual items we keep in the carpet bags in this blog post.
All of these items, except for the calendar, are in our Pack It! Learn It! unit. You can find it here.
The Pack It! Learn It! unit
The calendar notebook
I'm not going to lie, sometimes it looks like this! But I'm telling you, it is worth it!
Organization Tip Number2: Label materials for kids! I used Erica Bohrer's farmhouse labels to begin. Then, I just took my camera and snapped a picture of the things that are inside of each tub. I added the pictures to the label. This makes it super easy for the kids to clean up independently.
I also label my resources. These tubs contain the math activities I use for each of the strands. They include the activities for the Math Manipulatives and for the Small Group Math Activities. These units can be found here:
Math Manipulatives Bundle
Small Group Math Bundle
Organization Tip Number 3: Take advantage of hidden storage to hide your clutter. By adding a curtain to hang over the open shelving, I can hide all kinds of things!
Don't forget to use your closets wisely. Label items and place them in clear storage or put a picture on the outside. It makes it easier for the eye to find the needed items.
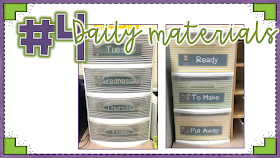
Organization Tip Number 4: Organize your daily materials. We have a drawer for each day. On Friday, we fill up the drawers with ALL the things we will be using the following week. Then, each morning all we have to do in remove the items from the drawer and we are ready to go. The second stacker holds materials that need to be prepped, need to be put away, or are ready for us to use! Volunteers can help by removing items from the To Make drawer. As they finish prepping, they just move the items to the Ready drawer. I use the Put Away drawer to hold the things I am finished using until I have time to put them away correctly. This keeps the items from being stacked around the room. You can grab these labels for free at the bottom of the blog post.
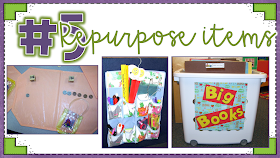
Organization Tip Number 5: Repurpose Items. Placemats are great to define work spaces. When the children are engaged in an activity with lots of pieces, a placemat helps them keep up with what is theirs and what belongs to their neighbor. A baby shoe bag works great to hang onto the back of your easel. It can hold all of the things that you use while charting! And, a rolling laundry basket makes a great container to hold all of your big books!
Organization Tip Number 6: Have a Panic Shelf. Really this shelf should be called the "No need to Panic" shelf. This shelf holds all of the things that I use during large group time. It holds a set of magnetic letters, calendar pieces, transition tools, helper supplies, etc! No longer need to hunt for these items! They are right there waiting on you!
Organization Tip Number 7: Organize your classroom library! Making books easy for kids to find is essential to positive experiences while shopping for books. You can read all about how we make that happen in this blog post. This blog post also has some free labels and tags to help you with your leveled libraries. You can find our interest or topic tags here.
Organization Tip Number 8: Find places for all of the small items! We love these storage containers we picked up at Wal-mart. They are great for organizing all of your letter sets. These are our magnetic letters, but we also use the same kind of unit for foam letters, overhead tiles, etc. This makes it super easy for the kids to quickly find the letters they need to make words. The other contain, the one with names, hold photos of each child. I take their pictures at the beginning of the year. Then, I reproduce copies of their photos and store them in the drawers. This makes is easy for the kids to make an All About the Author page in their writing. We also use them in other activities like counting, sorting, number combinations, etc!
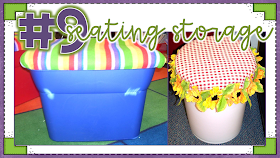
Organization Tip Number 9: Rethink your seating. Flexible Seating is a big buzz word right now! You can read about our take on flexible seating in this blog post. When thinking seating, think storage at the same time. We store our units in the sterile plastic tubs. I took a few extra lids and cover them. Then, when we start a new unit, I simple remove the lid and add one of the covered lids! Now they make great seating options! OR how about paint buckets?! These buckets make great seating options and are great for storing things like headphones!
Organization Tip Number 10: label the areas in your classroom. We have 5 areas in our classroom. Each area contains different types of seating, different activities, and different things to look at! The kids rotate through the room spending one day a week in each of the 5 areas. This keeps the surroundings new and stimulating. We label each of the items that belong in the area. This helps kids get things put back to where they belong during clean up time!


This comment has been removed by a blog administrator.
ReplyDeleteThis comment has been removed by a blog administrator.
ReplyDelete