There is a very specific format to Writer's Workshop. Each session includes a mini lesson, application-or work time, and a share time.
Step 1
First, let's look at the mini lesson. A mini lesson should last 10 minutes. The brain is wired to attend in 10 minute increments. By keeping the mini lesson to 10 minutes, the brain is able to focus the entire time! There are 4 specific components to the mini lesson.The first part of the mini lesson is the connect.
- To begin this part of the lesson, you should say, "Remember yesterday when we...".
- The brain learns by pattern. When we use the same key words to start each part of the mini lesson, the brain knows what is about to happen.
- This is not where we are asking kids, "Who remembers what we did yesterday?" YOU TELL THEM! You are trying to get all of the children in the same place so they are all building on prior knowledge.
- This is where you say, "Today I am going to...."
- This is where you state the standard.
- During this part of the lesson, you become the writer. You share what you are thinking and tell the children how you decided what to do.
- Modeling is sooooo important.
- This is where the kids see you actually model what it looks like. This is done during the teach part of the lesson.
- This is where you will say, "Now let me see you try."
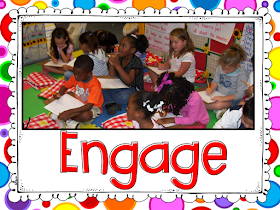
- During the engagement part of the mini lesson, the children will practice what you just did in the mini lesson.
- While the children are attempting the new learning, you should monitor. Who is getting it? Who needs extra help in a small group? Was your teaching method effective?
- During the engagement, the student's work can look very different.
- I love these three examples from the same lesson!
- The lesson was teaching the children how to make a list of My Favorite Things.
- Did each child master the lesson? YES! They are in all different places when it comes to their mastery of foundational skills, but when it comes to making a list of their favorite things...check--they all got it!
- During the link you say, "Remember boys and girls, today and everyday, good writer's..."
- This is where you repeat the standard.
- Then, in order to ensure that my children are practicing the academic vocabulary, I tell them to turn and tell their partner what good writer's do.
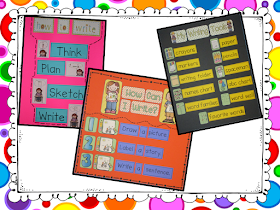
During the mini lesson you are building anchor charts with your kids.
- Anchor charts are not brainstorming charts. These charts are bullets of your mini lessons.
- While you are teaching a unit, they are referred to by both the teacher and the kids.
- The charts are not posters! These charts are made in front of the children.
These are some anchor charts. I know, I know...they LOOK like posters. How could these have been made with children? When I first started with Writer's Workshop, I wrote the bullet each day on the chart during the mini lesson. But, here's the problem...I didn't like the way the chart looked so I would write it over. Does that sound familiar? Guess what, when you hang up that beautiful chart, your kids have no clue what it says! They had no part in that chart. Take ownership in your messy charts and hang them up! OR if you just can't, which I couldn't, here's what you can do.
- I made my charts ahead of time. Remember the charts bullet your mini lesson so there will be no surprises.
- I added pictures to help my children know what each bullet says.
- At the beginning of the week, I covered up all of the bullets with a piece of bulletin board paper.
- Then, each day, we did "the reveal". I would lower the paper to reveal the next part on the chart.
- While we are working on a chart, I keep it on my easel in the front of the room.
- As we finish with the chart, I move it to the display area.
- Only the charts that you are actively teaching from should be displayed.
- That means, when you move to non-fiction writing, you will not need your personal narrative charts displayed. You can take them down.
- Have a specific place that you hang the charts. The brain is able to recall the information just because of where you hang the charts. The brain is able to take a picture and can recall the information even when the chart is down.
Step 2
After the mini lesson, you move to the Application portion of the Workshop.- The Application Time is where children apply what THEY know as a writer. Because of this, Writer's Workshop is the EASIEST way to differentiate! Each child plugs in wherever they are...some will draw, some will label, some will write! They are all working on the same genre.
- Each child will have a writing folder.
- I store the writing folders in these hanging file folder tubs.
- There is a hanging file folder for each child.
- They keep their writing folders inside of the hanging folders. This makes it very easy for them to find their folders.
- In the red hanging file folders, I keep the various kinds of paper that the children can use.
- We send the writing folders home.
- The parents are invited to "scrapbook" the folder with pictures. The children can use these as inspiration for writing topics.
- Inside the folder, the children need a place to store pieces they are still working on and ones they are finished with.
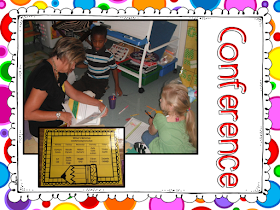
- While the children are working by themselves and with partners, you can pull small groups of children for conference groups.
- Pull children who have a common need.
- Address that need in a small group lesson.
- You can also talk to individual children, but I usually try to do groups. This helps me see more children.
Step 3
Once the Application Time of the lesson is over, you are ready for Share Time.- Share time is done daily.
- This is the time that you are celebrating and lifting writers. You are developing their confidence to attempt things on their own. You are showing them that writing can look different, but that all writing conveys meaning!
- Have you looked at your listening and speaking standards? In those standards it states that children can engage in conversations about grade level topics. It also says that children can engage in conversation with multiple exchanges. Share time takes care of ALL of those standards!
Step 4
That's it....that's the format for Writer's Workshop. But, how do you know if they have "mastered" the standard? How do you assess writing?The only way to accurately assess writing is through a rubric. This is the rubric that we use for personal narratives.
- Numbers 1 and 2 are used to assess the writing standard. For the writing standards, the children do not have to actually "write" text. The standard says, "Draw, write, or dictate...."
- Numbers 3 and 4 are for the foundational skills. Help the reader is where you are looking for spacing, punctuation, dominant sounds, etc. depending on the time of the year.
- Number 5 is for the speaking and listening standards.
- Once I use the rubric, I can now show growth on ALL of these standards!

Here are some of my other writing units.


Thank you for sharing your helpful advise and useful ideas. I love the clarity of information and the friendliness of your blog. I am a relief teacher in Auckland, NZ who began teaching in 1965 when it was a big deal for three broad nib felt pens to be included in the annual classroom stock issue.. What a difference they made to classroom notices and charts. Wax crayons just didn't cut it after that.
ReplyDeleteI get so inspired when I see how you use the current technology so competently and creatively. Thank you for sharing so generously.
Are there mini-lesson lesson plans that these spreadsheets follow? I have purchased the unit, but was wondering if you just followed the spreadsheet to help guide your lessons or are there actual mini lessons somewhere? Do they align with Lucy Calkins units?
ReplyDeleteCwaltkon...I have not written scripted plans to go with the units. While I did not use Lucy's units to plan mine, these units follow the same workshop frame work and cover many of the same concepts.
ReplyDelete