Thursday, April 20, 2017

6 Easy Steps to Learn any Sight Word

If you asked me 20 years ago would kinders need to be able to read words, I would have easily answered no! But, things are constantly changing, and standards are becoming more rigorous. How can we teach words in a way that accomplishes the task in the most developmentally appropriate way possible? This post will show you how we do it!
First, let's look at how our brain actually learns a word. This will make sure that we are optimizing our teaching time.
Steps to Learn a New Word:
1. Show the child the word.
2. Discuss the word.
3. Mix-up, or cover up, the word.
4. Have the children use magnetic letters, shaving cream, dry erase board, etc., to make the word without look at your word.
5. After they write the word, show the child your word and compare their word to yours.
6. If necessary, try again from the beginning.
Let's look at this example, to see what it looks like in action. 
1. Each child has a piece of black paper taped to the ground. Shaving cream is on the paper.
2. I write a word on the dry erase board. In this case I have written "can".
3. We talked about the word, how many letters, spelled it, etc.
4. I hid my word. The reasons we are hiding the word is to train the brain to look at the word as a unit. If we don't hide the word, the kids write a c and an a and a n. They do not write can.
5. The children attempt to write the word in the shaving cream. If they are unable to write the complete word, have the children "erase" the word.
6. Show them the word again. Talk about it again. Hide it again. Let them try it again...and again, and again....You get the point, right?
7. The good news is....the brain is very trainable! After a few sessions, the kids will start to catch on. The brain will begin to see the word as a chunk. This is why kids can learn to read sight words without knowing the letters!
Parking Lot Words
Another thing we can do to help our children be successful with sight words is to develop a "parking lot" for new words. Each week, we add new words to our word wall. On Monday, instead of putting the new words on the word wall, we put them on our "Parking Lot". The words stay there until Friday when they are moved to the actual word wall. The Parking Lot keeps the new words front and center. It lets you know which words to spotlight during charting, games, etc. You can get the Parking Lot and word list freebee below.
Word Rings
Just because the word is on the word wall doesn't mean that the kids all know the word. In the same note, just because a word isn't on the word wall doesn't mean that they don't know that word.  The word wall is adjusted to meet grade level standards. But, as we know, some kids work above that standards while others struggle to meet it. How can we differentiate the words are kids are learning and still maintain a classroom word wall?  We use word rings. Here's how they work.
1. First, we test each child over the words on the list. If you have a lot of words, you might want to start with just the first 20 or so. The list of words should match the first 20 words that will be added to the word wall.
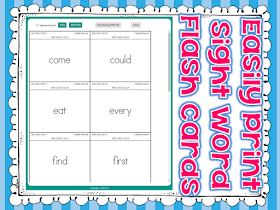
2. Pick one child and ask him the words. Highlight any words he knows. (Or use ESGI! This screenshot shows what is on the ESGI assessment.)
But, when you are assessing, the kids will see this screen with one word at a time. As each word appears on the screen, you will be prompted to indicate if they know the word or if they don't know the word.
3. Now it's time to make a ring of words for each child. Add the highlighted words to a ring. Put the child's name on the ring. You can print your own word cards, or use the flash cards that are included with ESGI.
4. Repeat for all of the children in the room.
5. Each day, invite each child to read their ring of words. I do this in the morning as they are coming in, during centers, etc. 
6. Each child needs a 70%/30% ratio of known to unknown words.  That means, if a child has 10 words on their ring, they should have 7 words they know, and 3 words they do not know.
7. As a child masters a word, add a new word to the ring, never having more than 30% of known words.
The parent letter on ESGI is one place where you will find the known and unknown words. There is a bar graph that you can use as well. Use this promo code to try ESGI for Free and to Save if you decide to purchase. http://www.esgisoftware.com/ESGI/?promo=adsit



Wednesday, April 12, 2017

Developing Number Sense with the Number Line Mystery Game

Want to play a super fun, easy game to teach number sense with the number line? Then, this is the game for you.  Our kids love this game, and ask to play it all year. Here's how you play:
You can use any deck of cards. I make decks to match the various seasons so that we can play all year.  You can also change the number pattern on the cards. This game is a 1-10 game. You can also make it 1-20 or a skip counting pattern. You choose depending on what you are teaching!
Getting Ready to Play
  • First, you need 4 sets. I have ladybug, dragonfly, butterfly and caterpillar sets.
  • Place a card for each set and NO numeral in a column on the left side. 
  • Shuffle the 40 cards.
  • Lay them facedown in 4 rows to create an array.
Playing the Game
  • Invite one child to turn over ANY card.
  • Look to see what is on the card. (4 ladybug)
  • Decide on which row (set) the card belongs.
  • Decide where on the row the card belongs.
  • Always ask, "How did you know?" to allow children to share their thinking.
  • Once the correct location is decided, remove the card (4 butterfly) that is laying face down in that location.
  • Lay the 4 ladybug down.
  • Hand the second child the next card (4 butterfly).
  • Once the correct location is decided, remove the card that is laying face down in that location.
  • Decide on which row (set) the card (4 butterfly) belongs.
  • Decide where on the row the card belongs.
  • Always ask, "How did you know?" to allow children to share their thinking.
  • The game continues until all of the 40 cards are turned over and in the correct location.
This game comes from this Insects and Bugs unit.
https://www.teacherspayteachers.com/Product/Insects-Activities-for-Math-and-Literacy-124847


Sunday, April 9, 2017

Publishing Nonfiction Text with Paper Doll Books

Marcia Tayte tells us the importance of art in learning and developing brain power. This is a fun way to incorporate art, writing nonfiction text, and information about insects.
This paper doll book is really quite easy to make. At the beginning of the year, I teach the kids how to fold the paper to make the book.  We do it together several more times. By this time of the year, they are an expect and can easily make their own. Here are the steps to make the book.
First, get a piece of 12 x 18 construction paper. Invite the children to fold the paper in half like a "hotdog".
Leave the paper folded hotdog, and fold it again. This time fold the paper "hamburger".
Now, fold the paper again "hamburger" style.
Unfold the paper. Using a pair of scissors, invite the children to cut out the rectangle on the bottom left and the rectangle on the bottom right. Save these for later.
Fold the two outside rectangles on the top row over. This will make the jacket for the paper doll.
Using a pair of scissors, invite the children to cut a triangle between the two bottom remaining rectangles. This will divide the two bottom rectangles to make legs.
Glue the two rectangles (cut out earlier) behind the jacket to make the arms.
Use patterns, or free cutting, to make the head and shoes. The children can trace their own hands to make the hands for the paper doll. Use scrapbooking paper to make the jacket front.  Add a name tag, and you are all done with the paper doll.
Now it's time to add the "All About Insects" book.  Staple a cover, a diagram page, and several blank pages together.
Work together in a guided writing, or invite the children to work independently to make a table of contents.
On the first page in the booklet, the children draw and label an insect. Provide several nonfiction books that include diagrams of various insects for the children to use as a reference. On the remaining pages, the children write facts to match the table of contents.
https://www.teacherspayteachers.com/Product/Insects-Activities-for-Math-and-Literacy-124847
This idea, the reproducibles for the paper doll and the nonfiction book are included in this unit.


Wednesday, April 5, 2017

Insects and Other Bugs Activities

It isn't spring in kindergarten if you aren't talking about bugs! How many ladybugs, beetles, and other crawling bugs do your children bring to you each day on the playground? Here are some of the fun activities we are doing to learn all about Insects and Other Bugs.
I know an Old Lady Who Swallowed a...
Invite the children to create the old lady paper doll. When gluing down the mouth, only put the glue along the left edge. This will allow you to lift the mouth. Select an insect clip art picture to glue inside the mouth.  On another day, provide the children with the clues frame. The children write clues to match the insect inside the mouth. Writing clues is a great way to teach descriptive language. 
SWAT! It!
Use this fly swatter activity to teach subtraction.  Reproduce a fly swatter clip art and a swat blob.  Invite the children to glue them to the paper and add a handle to the fly swatter.  Provide the children with 2 dice. Roll the dice and write the number sentence on the recording page. Glue fly clip art to the project to match the number sentence. Write the subtraction story on the recording page.
Ant Hill Subtraction
Give the children the ant hill pattern. Invite the children to use a black crayon or marker to draw anthill tunnels. Roll two dice and write the equation on the recording page. Using a new pencil, children dip the eraser end into black paint. Print 3 dots touching to make an ant. Make ants on the paper to match the equation. Once they are dry, add features with a marker. Write the subtraction story on the recording page.
What is in the Jar?
Here is another fun activity to teach descriptive language. Invite the children to make the kid holding the bug jar.  Use scrap paper to create a bug in the jar.  Provide a second jar clip art with lines for writing clues. Children write three clues about the bug in their jar.
Ordinal Number Bugs
Make a flap foldable by creating 9 different sections on the folded strip of paper.  Sequence the numbers on each of the flaps. Glue a bug under each flap.  Each child's work will be different as they can glue the bugs in any order they wish! Record the ordinal position of each bug on the recording page. Use a bingo dotter to add color to the bugs.
Ladybug Cookies
Kids love to cook! Cooking is a great way to teach procedural text. The children must read the recipe to know how to make the cookies. For this cooking activity, the children frost a sugar cookie red, yellow or orange. Then, they add an oreo for the head, chocolate chips for the spots, and yellow gel frosting for the eyes. 
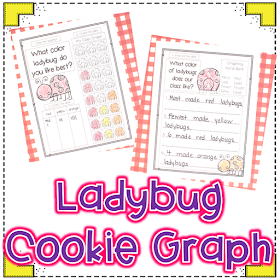
Cookie Graph
Once the kids make their cookies, create a graph to show which colors the kids frosted their ladybug cookies.  Invite the children to ask their friends what color they frosted their ladybugs. Tally the results. Next, use the tally marks to create a graph.  Last, the children use the graph to analyze the data.
Number Word Jars
These jars are an easy way to teach number words and to develop a mental image for each number using a tens frame. On each page, the children glue bugs into the tens frame to match the number word. Use bingo dotters to add color to the bugs.
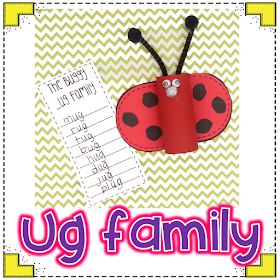
_ug Family Game
This game is useful for teaching words in the _ug family. Invite the children to place the various onset circles onto the game board to produce _ug family words.
Toilet Paper Roll Ladybug
As the children are making the words on the game board, record the words on the recording page.  Paint a toilet paper roll red. Add wings, spots, eyes, nose and antennas to make a ladybug.  Roll up the list of _ug family words and slide it inside the toilet paper roll.
Bug Jar Number Fun
This bug jar game is a great way to introduce the concept of mixed operations. To play the game, give each child a game board, insect clip art, and a dice. Invite the children to roll the dice. Put that many bugs in the jar. In this example, the child rolled a 3, so there are now 3 bugs in the jar.
Roll again. This time the child rolled a 2. They must decide what they need to do in order to have two bugs in the jar. I ask them, "do you need to take some out, or put some in?"  The correct response will be that they need to take one out to get from 3 to 2.  Continue to roll and move bugs so that the number on the dice matches the number of bugs in the jar.
The ideas in this blog post came from this unit.
https://www.teacherspayteachers.com/Product/Insects-Activities-for-Math-and-Literacy-124847


Sunday, April 2, 2017

Make the First 30 Days the BEST 30 Days

Spring is the time of year that we start to look forward to the next year. One thing I love about teaching is that every fall we get a "do over." Now is a great time to start thinking about what you want to do differently next year. Starting off a new year is full of excitement and jitters! As a teacher, you are often thinking: What can I do those first days of school that will lay the groundwork for a year full of learning, engagement, and success?
I'm excited that I am working with SDE to bring a summer seminar, "The First 30 Days of Kindergarten."In this seminar you will learn just how to make those first days your best days!
Here are some of the ideas that we will cover in this idea pack 2 day event!
All Eyes On You: Have you heard the saying, “You can’t teach a class you can’t manage?” In this session Kim will show you how to get the kids attention starting that first day! She will share how to establish routines, procedures and independence. She will also share how to develop a schedule that has a balance of independent and group work.
Get ready to learn some new chants to get their attention: You say, "1,2,3 Look at me!" They say back, "1,2 Looking at you!" OR How about a new chant to get them read for the hall, You say, "Ready set?" They say back, "You bet."
Flip This Room: Room Arrangement In this session Kim will show you how to use classroom arrangement to increase effectiveness of your teaching. Learn how to store classroom materials resources to increase teaching time. She will share how she uses different kinds of room arrangement and grouping for different kinds of instruction!
Here are a few of the simple storage ideas that we will share. To store those daily resources, try a stacking drawer storage container. Label each drawer with a day of the week. Before you leave school on Friday, be sure the drawers are stuffed for the next week with everything you will need!
Another way to use the stack drawer storage containers is to organize your projects. Put all of the projects you need to get done in a drawer. Invite parents to pick things from the drawer to assemble. When it is ready, place it in the ready drawer. As you are teaching and finish with the resources, place those items in the put away drawer to keep your room clutter free.
A rolling laundry basket makes a perfect storage unit for your big books!

Establishing Routines and Procedures in Reading and Writing:  In this session Kim will walk you through the steps to set up effective Reading and Writing Instruction. She will show you how to use the Workshop Model of teaching to maximize learning by balancing mini lessons and worktime. She will also share how to scaffold your learners by unpacking learner outcomes.
We will explore the components of the mini lessons: Connect, Teach, Active Engagement, and Link, and the purpose for each. The Connect reminds the children of what you did the last time. This gets all the kids ready for the new learning. The Teach is where the teacher tells the children the new learning and models what it looks like. Next is Active Engagement. This is where the kids practice the new learning. And finally, the link is where the teacher reminds the kids of their new learning.
Establishing Routines and Procedures in Literacy and Math Centers: In this session Kim will show you how she develops independent learners so that she is able to effectively work with small groups. One way to run effective centers is through effective grouping.
During centers our children work with their "family" group. This is a group of mixed abilities, mixed personalities, etc.--they work together well, but don't often choose to play with the members of the group. While the kids are working in centers, I pull small groups. These groups are based on formative assessments and are always changing--these are flexible groups! Once the kids are working in centers, I walk around the room and collect the children that I need. After the small group lesson, they return to their center group and continue working.
DI: Easy As Pie: In this session Kim will share how to effectively use formative assessments to drive your instruction.
One of my favorite formative assessments is "Who is in the Club?" This works well with standards that are quickly and easily assessed. As part of our morning meeting, children have the opportunity to join the club by demonstrating their mastery of the standard. I only call on a few kids each day. Kids volunteer to respond. Those that haven't volunteered by Friday, I pull during centers and assess them separately.
Making a Good First Impression: In this session Kim will share how to establish a good parent teacher relationship those first few weeks.  She will share how to set up a Meet the Teacher night that will be sure to WOW your parents!
Open House is the chance for parents to make that first impression of you as your child's teacher. Set up an Open House that will blow them away! One thing we do is to make this simple craft.  The poem is by my sweet friend Angie! The parents now have something to take home, hang on their frig, and use to display their munchkins work all year!
Developing A Love for School: In this session Kim will share some of her favorite activities from the first 30 days of school.
This fun sorting activity will help introduce the kids to the things in your room.  Cut apart a set of clip art. Invite the children to sort the pictures--things that are in their classroom and things that are not in their classroom. Use the sorting circle to create wheels for the school bus.  At a small group, invite the children to create a face using a paper plate. Add the paper plate faces to the bus and display for all to see!
Here are a few of my favorite back to school resources!