After I read the whole story, I asked the children to think about what happened at the beginning of the story. I had them turn and talk to their elbow partner. As they talked, I "listened in" to see what they were saying. I called them back together and quickly summarized what I heard them saying. I repeated this process for the middle and the end of the story.
Later that day, we used interactive writing and wrote the things that happened in the beginning, the middle and the end. As I called children to help write on the chart, each child had their own recording sheet to complete.
This is an older version of the recording page.
This is the updated version. I also added a page without lines. This is a great way for your non-text writers to record the beginning, middle and end of the story. This is from the Reading Is Fun unit.
On a third sitting, I read each part aloud to the children. Each time I asked them if it was the beginning, middle or end of the story. Each time we went back to the text to find evidence to support our answers.
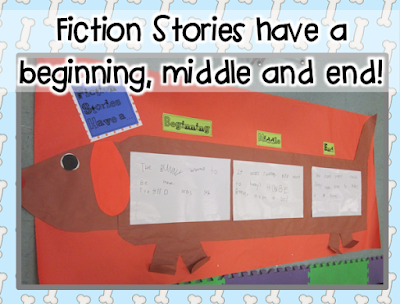
After I read each part, I invite the kids to put their hands on their head if they thought it was the beginning of the story, on their belly if they thought it was the middle of the story, and on their "tail" if they thought it was the end of the story.
Here is our finished product.
We then gave the children pieces of paper and their cut to make their own dogs. No patterns....use your brain and think how to cut the paper to make a dog! They glued their beginning, middle and end recording pages to the back of the dogs.
I recently made an interactive post it chart unit. I love how I can easily make this chart and use it over and over again. Simply record the parts of the story on post it notes. Read each part, invite the children to tell you if it is from the beginning, middle, or end of the story. Go back to the text to find evidence to support your answer.
Here are the units used to write this blog post.
Interactive Post It Note Charts


13 comments:
Thanks for the great ideas!
Ѽ Alessia
Mrs. Albanese’s Kindergarten Class
These are so cute! I am a big fan of wiener dogs and kids are too! What a great lesson. Check out this cute graphic of a wiener dog I found just today! They are hard to find!
http://melonheadzillustrating.blogspot.com/2012/02/request-from-jennifer.html
Sandi
Very cute! Super fun idea to teach B, M, & E!
Jennifer
First Grade Blue Skies
So cute! I have two doxies, so I always enjoy seeing activities with those little pups!
Erica
sprinklestokindergarten.blogspot.com
This is fantastic! I bet the kids just loved the wiener dog. I love the interactive writing!
~Andi
I love this...thanks so much for sharing! On another note, do you happen to remember where you got that shirt? It looks similar to a style I've been trying to find and can't {sorry for the randomness!}
Thanks!!
Vickie
Mrs. Plant's Press
Kim,
What a great visual and wonderful way to help kids learn the concept of beginning middle and end. I know that my kindergarten kids are going to love it.
Thanks for sharing and providing such wonderful visuals.
Regards from Western Canada,
Anna
Vicki, The shirt came from Chadwicks, I think!
Thanks!!
This is a fabulous idea! My students can usually tell you the beginning, middle, and end during a read aloud- but then to transfer that into their own writings can prove difficult.
Tara West
Little Minds at Work
I LOVE this idea-especially using the weiner dog to help emphasize beginning, middle, and end. I am currently using this lesson to teach my first graders about b,m,and e. Thank you so much for posting.
Great idea. I really like how you defined some characteristics of beginning (short), middle (long), end (short) to help children identify these parts. I am wondering what are some other characteristics that you or students identified.
Post a Comment